So, we’re going to Salem this year– not content with decorating my own handmade hat, I couldn’t help picking up some extra spooky items to decorate a storebought knit witch hat for a friend.
They’re not my favorite shape, but these hats are cheap and widely available, and look slightly less tacky than the thin nylon hats you can get at the Halloween stores. Here’s how I gussied this one up:
I added a multi-layered hatband, which was made from a black organza band/bow I’d harvested from a different hat, a deep purple velvet ribbon, and some heavy black lace.
I hot-glued a plastic skull to the center of the bow, and added a black and purple feather pick for dramatic effect. I tucked in some deep purple artificial flowers and loops of black and purple velvet ribbon to fill in the corners.
And my favorite part: the spiders! These are just basic black glittered plastic spiders, with beetle wing casings (leftover from the Lady Macbeth beetlewing dress) hot-glued on top to make them more realistic looking! I stitched them to the hat as if they were climbing up it, and I love the pop of color they bring!
So last October I went to Salem with my family to enjoy the Halloween-adjacent festivities, and came across a vendor selling the most gorgeous witch hats– Evercrumbly and Witch. Seriously, their hats are just beautiful, and such great quality! I was sorely tempted to buy one, but I just couldn’t justify it in my budget. So I reluctantly walked away from the wall of fabulous hats, and went home to start plotting.
Plotting what? Making my own hat, of course!
I’d never done millinery from scratch before– only modifications of existing hats– so it took me a while to assemble my materials and decide on how to approach the project. I’d have liked to use buckram and millinery wire, but those are specialty items and I wanted to keep prices somewhat reasonable, if only to justify spending a bit more on decoration rather than structure. I ended up using Pellon Peltex 70 Ultra Firm Sew-In Stabilizer for the brim and a lighter weight stabilizer for the crown– oddly enough, I bought the Peltex Ultra Firm at two different stores, and despite the labels being almost identical, they were distinctly different in thickness. I can’t figure out why…
I also got some 16-gauge galvanized steel wire to strengthen the edges– I’d read that millinery wire is only 19-gauge, but 19-gauge didn’t seem nearly sturdy enough in my samples, so I went with 16.
For the main hat fabric I splurged a little and bought some black velveteen– it’s so dark and rich and soft to the touch, which makes hat look luxurious (as opposed to looking like a cheap costume hat). I will note that while I have sworn never to sew with velvet again, velveteen is different (less wiggly) and is much easier to sew! For the underside of the brim I wanted a hint of color, so I picked out a polyester faux dupioni in a dark reddish color called “eggplant.”
Once I had my basic starting materials, it was time to make a paper mockup– I taped together paper grocery bags to get large enough sheets of stiff paper to use.
First, I measured my head circumference at the angle I planned on wearing the hat– for me that was slightly higher in front and lower in back, and it was 23″. (apparently I’ve got a big head– 22″ is more standard)I knew I wanted the head opening to be slightly oval rather than round to fit my head better, so I got some pipe cleaners and wrapped them around my head to figure out the correct shape. Once that was done, I measured the length of the oval at 8″– I estimated that I’d want my brim to be about 5″ wide, so that meant that the brim piece would be a circle 18″ in diameter (5″ + 8″ + 5″). I drew that out and placed my pipe cleaner oval in the center, tracing out the shape of my head for the center hole.
I drew another, smaller oval about 3/4″ inside the head oval, and cut that out to make tabs that would stick up from the center. I had a basic brim! I tried it on and it fit properly, so that was a good start. I will note that I did anticipate that the thickness of my materials would require me to enlarge the head hole in the final hat– however, rather than cut it too large to begin with, I figured that I would carefully enlarge it once I actually got to that step in construction. It’s so much easier to cut holes larger than to make them smaller again!
For the conical crown, I knew I wanted to make pleats at various points in the cone for a crumpled look, so I’d have to make it initially taller than the finished height. I tried one at 24″ high, but since that ended up being too tall, I made another at 18″ high. To trace out the pattern piece, I marked a vertical line 18″ high, then marked out a curve on either side using the 18″ measurement, forming a wedge shape. I did a little math to estimate the angle of the wedge, but eventually just used a tape measure to figure out how much of the wedge formed a 23″ curve.
Once I had my wedge of paper, I taped it together edge-to-edge with painter’s tape to make the cone. I checked to ensure that the bottom matched up with the hole in the brim (it did) and then started figuring out where to put my pleats. It was mostly by eye, and since I wanted the hat to bend in one direction, I knew that the pleats would have to be deeper on one side than the other.
To make the pleats, I marked two lines for each– one “hill” and one “valley.” I creased the paper with my fingers (valley first, then hill), and then pushed the valley section down into the crown.
It took some fussing to get the pleats looking as I’d envisioned, but eventually I had a decent mockup of the crown. I tried it on with the brim and made some final adjustments (trimming the brim down by about 5/8″ all around). Then on the crown I marked the hills and valleys with a Sharpie, then untaped the seam and spread out the paper to see where the markings had ended up. I transferred everything to a fresh sheet of paper, using different colors of pen to mark the hills and valleys so the pattern would be easy to use on my fabric.
Next up: Construction! Also, a terrible realization of error!
Once I’d finished my 1880s Squirrel Dress, I had to have a hat to go with it. I have yet to venture into completely handmade millinery, so I’m always eager to find existing hats that can be adapted to more historical uses. My favorite may always be the Regency Cowboy Hat bonnet, but this one is a close second– I made it from a children’s trilby hat in bright pink.
I was going for something along the lines of the hat in the center here:
I know it’s been ages since I finished this dress, but then I had to make a hat to go with it, and then I had to find a time to put on the whole outfit and get decent photos, which always takes forever. In any event, I finally got around to it one lovely September afternoon, pinning my hair into a makeshift Edwardian updo and grabbing an old edition of Pride and Prejudice for a prop. I wore my adapted Edwardian strappy shoes, though they weren’t particularly visible in most of the shots due to my poses.
I admit that I probably relied a bit too much on the book to pose with (I have soooo many pictures with me “reading”)– for some reason I just can’t come up with interesting poses that don’t look forced, and for this particular outfit I wanted to show off the columnar lines and button details, which constrained my angles a bit. But I had fun, and managed to get pictures taken before the last of our summer flowers wilted, so I’m counting it as a win!
Overall, I love this outfit– it’s so cool and comfortable, and perfect for a casual picnic or afternoon event. Now I just need to find one to attend!
Also, look how well the picture converts to black and white! Love this one…
Next up was the hat. The original hat (or a least one of the original hats shown in photos– there appear to be a few) was an almost lampshade-shaped straw hat:
Tough to find, particularly in winter, and hats can be expensive in vintage shops. Luckily, I found something very similar in the costume section on Ebay! It’s called a “coolie” hat (which I find kind of racist, for what it’s worth) and the photo was pretty close in terms of shape.
Of course, when it arrived it was a lot flimsier than the original hat looked to be, plus being more conical with a less defined crown. I decided to add some wire around the brim to stiffen it up– I unpicked the stitches holding the straw edge binding, then cut off about 3/4″ all around the edge (it was just a bit too big for my taste) before stitching some thick brass wire around the underside and reattaching the binding with hot glue.
To go with my fur-trimmed wrap I needed a hat to wear outside. Unlike all of my other bonnets, however (which are made of straw), this one needed to be winter-appropriate, so I took out my extra velvet fabric and got started.
I picked up a basic cloth-covered sun-hat at Goodwill (brand new, tags still on!), mostly to use its nice, wide brim.
I wanted the brim to frame my face without being too sunbonnet-y, and I wanted to have a nice big crown with room for a nice hairstyle that wouldn’t get squished. Something like this (apparently it’s called a capote):
I also really like the ruching on this bonnet from the 1995 Pride and Prejudice:
To make my lilypad-shaped fascinator, I started off by picking out a remnant of celery-green fabric from my stash– it’s satin on one side and dupioni-ish on the other, and I’d originally bought it to line my Regency ribbon-rose reticule. I thought it would coordinate well with my suit– however, once I actually got it out it was clearly too pale a green to stand out next to the bright turquoise suit. I decided to try dyeing it with Jacquard Dye-Na-Flow, which is my go-to for tiny dye jobs like this since it works on both natural and synthetic fibers.
I did a few test swatches and ended up using a combination of Turquoise and Chartreuse in a 3:1 ratio. Because my fabric was super-non-absorbent (seriously, water and dye just beaded up on its surface) I had to soak it in water for a good long time to get it wet, and then painted the undiluted dye directly onto the dampened fabric. The dye still wouldn’t spread naturally, so I ended up rubbing dyed parts of the fabric onto the un-dyed parts to get it to distribute evenly. It was a hassle, but the finished shade was a nice springy green.
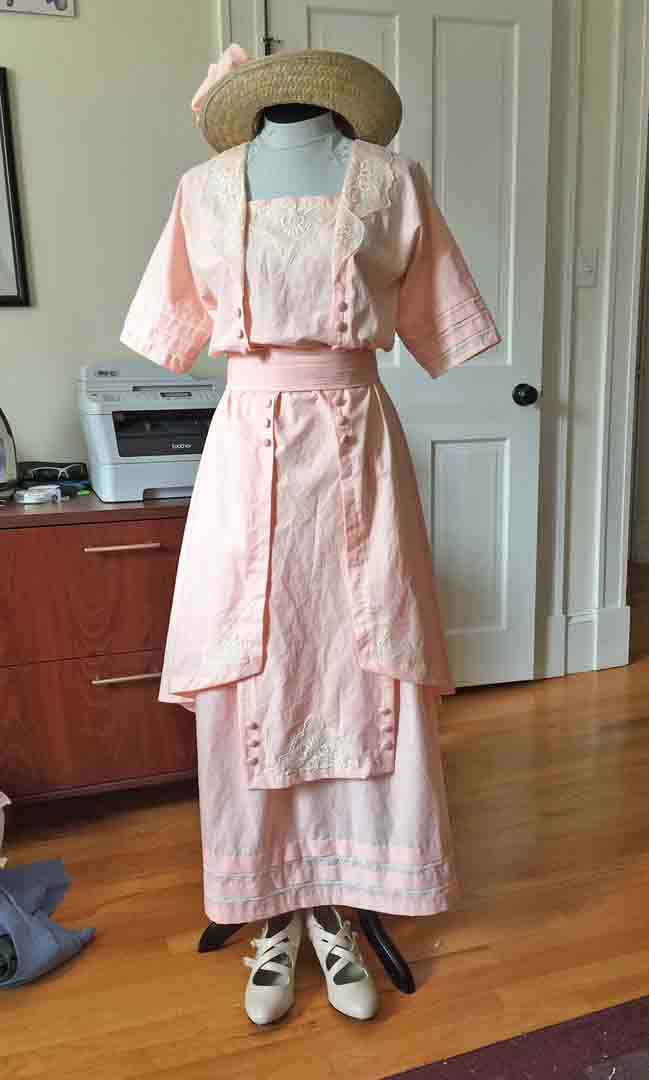
So the outfit is finished at last! Here I’m wearing it over a modern sleeveless cotton blouse that passes as a corset cover, and an antique Edwardian petticoat. (I’d planned to wear a corset but ditched it at the last minute because I thought it would be uncomfortable to wear while sitting on the ground) I accessorized with my Edwardian pumps, my bow-bedecked hat, and a paper parasol. Here are some shots of the full outfit!
Channeling my inner Lady Mary… I’m totally judging whatever it is I’m looking at off in the distance.
As I’ve said before, I always do appreciate when a dress turns out exactly as I’d pictured it. It doesn’t always turn out that way, which is sometimes a good thing, but there’s just something so satisfying about comparing the sketch to the real thing and seeing it come to life.
So to go with my 1915 picnic dress, I needed a hat to shade my delicate complexion from the sun (or something like that). I tried using my flowered Edwardian hat but it seemed too elaborate for the relatively casual dress, so I went looking for something new.
Since it’s summer there are plenty of straw hats available, but most of them are pretty floppy and that wasn’t what I was going for. I thought I’d start with something more boater-shaped, but apparently I was cutting it a bit close time-wise because most of the cheap boater options online had a 2-3 week shipping time, which was too late for my upcoming picnic.
I ended up with a costume gondolier hat, which is coarser straw than I would’ve liked, but it looked about right. Many purchasers complained that the crown was too shallow and the head circumference was too big, making it sit oddly on the head, but one reviewer (a woman after my own heart) noted that it was perfect for puffy Victorian/Edwardian hairstyles, which I thought made it worth a try.
To go with my 1840s day dress I knew I needed something to use as a head covering for Dickens Fair. Unfortunately, while the standard shape for an 1840s bonnet is really a “coal scuttle bonnet” with straight sides like this one:
… it was not possible to find one inexpensively on short notice. Further complicating the issue was the fact that I’d have to pack or ship the bonnet, which is a pain since bonnets are so bulky, so I couldn’t just make one at home and get it to California easily. What to do?