I admit that I didn’t take enough in-progress photos of the decorating process. I should have, since I went through a lot of iterations that I intended to keep track of, but all I’ve got are pictures of the finished hat. Sorry.
I used more of the eggplant dupioni to make a hatband and some decorative puffs of fabric, and then I used clear thread to stitch on an Art Nouveau-ish brass frame finding I’d found on Etsy– I’d have preferred it to be a bit larger, but I couldn’t find anything I liked enough in the right size. I added artificial raspberries in red and dark burgundy, and some purplish flowers (dark purple hyrdrangea blossoms, sewn together to make them fuller-looking) and smoky gray pearls (which you can’t see, but they’re there).
I really liked the finished hat– it’s not exactly understated, but I would call it elegant (for a witch hat, anyway). Can’t wait to wear it this year!
Once I had my paper pattern, it was time to get started on construction! It was quite an adventure, but I think I learned a lot– my next hat will be much easier! (I’m counting on it, since I promised to make my daughter a witch hat as well)
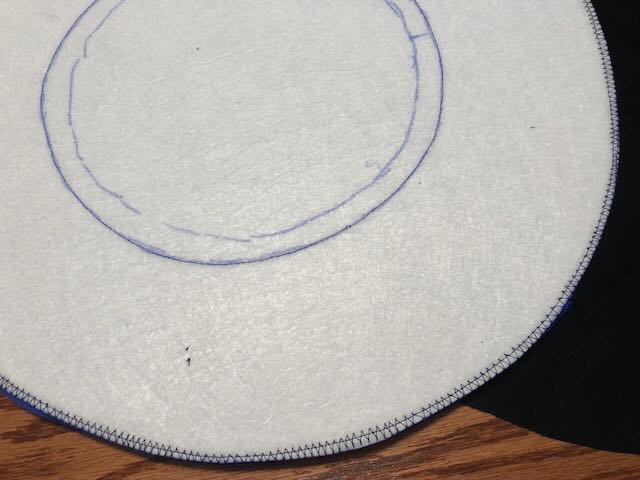
I started with the brim, cutting out a layer of my thicker Pelton Ultra-Firm interfacing in a circle to match my pattern. I also traced out my oval head-line and a line about 3/4″ inside that for tabs. After flapping the circle around for a bit, I decided that it was too flimsy, so I cut out a matching circle of the thinner Peton Ultra-Firm and stuck them together with spray adhesive.
I unspooled some of my 16-gauge wire and set it along the outer edge of my two-layer brim. It seemed a bit thick, so I cut away a tiny 1/16″ strip from the edge of the thinner layer of interfacing to make a little indentation to set my wire into. It actually made the stitching a lot easier, since the wire had a place to rest. I set my sewing machine’s speed to the lowest it would go, and very slowly and carefully used a wide zig-zag stitch to attach the wire. Be really careful with this step, you don’t want your needle to break on the wire and send bits of flying metal towards your face!
Once I had my brim base, it was time to cover the underside with eggplant dupioni. I cut out a circle slightly larger than the pattern and gave it a touch of spray adhesive before sticking it to the interfacing– the side where I’d sewed the wire, because I wanted to make that the underside. Then, working from the top interfacing side (which had my pattern markings), I machine-stitched around the edge (just inside the wire) and around the head line– this not only attached the dupioni, but transferred the lines to the bottom side of the hat. I trimmed the edges of the fabric down to the wire.
I repeated the process with the black velvet and spray-adhesived it to the top side before flipping it over to the dupioni side and stitching it again around the previously-stitched edge- and head-lines. Once stitched, I trimmed the velvet down to the wire, then cut away the center hole from all layers at once and sliced the tabs open.
I tried it on at this point, and to no one’s surprise it was much, much too small– the thickness of the tabs was making a big difference in the head circumference. Being cautious, I stitched another line about 1/8″ out from the original one, and snipped the tabs out a tiny bit more. Still too small. I proceeded to stitch out more lines in 1/8″ increments, opening the tabs out with tiny snips, until the hat fit properly– even a tiny bit loosely, since I plan on adding an interior sweatband and possibly a lining, which will add more thickness. Turns out I needed a good 1/2″ extra all around my actual head circumference, so keep that in mind if you’re making your own hat!
Once the hat fit my head, I bound the outside edge of the brim. I had originally planned to bind the edge with strips of my black dupioni, but it just looked too shiny (read: cheap) compared to the velvet, so I opted for wide single-fold bias tape in black instead (the standard stuff you get at the fabric store). I machine-stitched it to the velvet side, then folded it over and hand-stitched it to the bottom, using a curved needle.
Next it was time for the crown. I realized at this point that my pattern was going to be too small– it was drafted to fit my exact head circumference, after all– but rather than re-draw the whole thing I figured I would add an extra inch or so to the bottom of the pattern, which would translate to a larger bottom circumference and an only slightly taller crown. Luckily for me I was extra-generous with this step, because I later realized that I had done my math wrong– I had calculated that an extra inch would provide plenty of extra circumference for my head, when spread out over the entire circle. However, since I was working with only about 1/3 of a circle for my pattern piece, I had only 1/3 as much extra circumference as I thought I did! I ended up with *just* enough to work with, which I only discovered after I’d done all of the sewing work below…
Anyway, I traced out my wedge of black velveteen, this time with seam allowance along all edges, and also a layer of medium-weight interfacing. The interfacing wasn’t quite wide enough to reach the top of the cone, but I figured it wouldn’t be necessary at the very tip.
I spray-adhesived the two layers together, and also ran lines of basting stitches along the marked pleating lines from my pattern. The easiest way to transfer the pattern lines to both sides of my fabric was simply to trace the pattern onto tissue paper, pin the paper to the interfacing, and run long basting stitches through the paper before ripping it away from the stitches at the end. I used red thread for the hills and blue for the valleys, so it would be easy to keep track of them.
Since the valley lines weren’t going to show, I pinched them from the interfacing side of the fabric and hand-tacked them about 1/4″ from the basting line in various spots to encourage folding in the right direction. So much easier to do while everything was still flat…
Then I machine-stitched the edges of the cone together and clipped the point. I turned it right side out and finger-pressed the seam as best I could.
Next it was time to pleat the crown. It was already starting to fold in on itself due to my hand-tacking, so it was reasonably easy to coax it into the right shape, tacking some more spots on the inner curve where they wouldn’t show. I pulled out the basting lines when I was finished.
At this point I took the finished crown and folded up the bottom curve seam allowance until it matched the brim– like I said earlier, I’d expected to have plenty of fabric to spare, but ended up with just a teeny-tiny margin. Whew! I carefully cut away the interfacing from the bottom curve of the cone so I would only be folding up the velvet layer. For additional support I inserted a ring of 19-gauge wire into the fold as I hand-stitched it down.
Finally, I settled the finished crown over the tabs on the brim and hand-stitched them together. I will note that I ended up doing this step no fewer than three separate times– the second time was because I’d made the mistake of stitching the tabs too high up, which made the crown collapse in a bit as the tabs tried to fold inward; the third was because despite my careful fitting, the hat was still a bit too tight once I added the crown (not sure why exactly– maybe the wire?) so I had to go through and cut out one of the layers of interfacing from the tabs to give my head a bit more room before re-stitching. I’m glad I used relatively large stitches when I attached things– easy to pull out, and they won’t show once I add the decorative hatband!
Once I’d finished my 1880s Squirrel Dress, I had to have a hat to go with it. I have yet to venture into completely handmade millinery, so I’m always eager to find existing hats that can be adapted to more historical uses. My favorite may always be the Regency Cowboy Hat bonnet, but this one is a close second– I made it from a children’s trilby hat in bright pink.
I was going for something along the lines of the hat in the center here:
Once I’d finished the basic dress, it was time to trim the skirt. Originally I’d planned a double row of wide pleats on the underskirt, with another row of pleats along the bottom edge of the apron overskirt. However, the more I looked at the ensemble the less I liked the idea of all those pleats– they seemed fussy, somehow, and not as tailored and simple as the bodice. It was time to rethink.
I decided to make one wide row of pleats to put along the hem, and to put off further decisions until that was attached. Accordingly, I pieced together a 300″ strip of my fabric (with the stripes oriented horizontally for a fun variation), did a narrow hem on both long edges, got out my homemade pleater board (more on that later), and started pleating. It was really annoying. It took forever. My pleats kept pulling out of the board as I worked, and waiting for the pleats to cool completely before moving on to the next section was extremely tedious. But I suppose it could’ve been a lot worse– I could’ve had to pin them individually before pressing them, right?
So… you know how I said that I’d sourced all of my fabrics, and had picked out a dusty pink cotton I already had in my stash to use for part of the bodice of this dress? Well, I lied. Not so much lied as had second thoughts. And third thoughts. The pink was fine next to the striped fabric, but the velvet I wanted to use for the lapels was so deep and saturated that it just made the pink fabric look washed out and plain. The tough part was that I didn’t know what else to use– I didn’t want another patterned fabric that might clash with the stripes, but I hadn’t been able to find any other solid cottons that matched well. I couldn’t use taffeta or jacquard, because that wouldn’t work with the cotton main fabric– too fancy. I could always choose white, but that seemed like giving up.
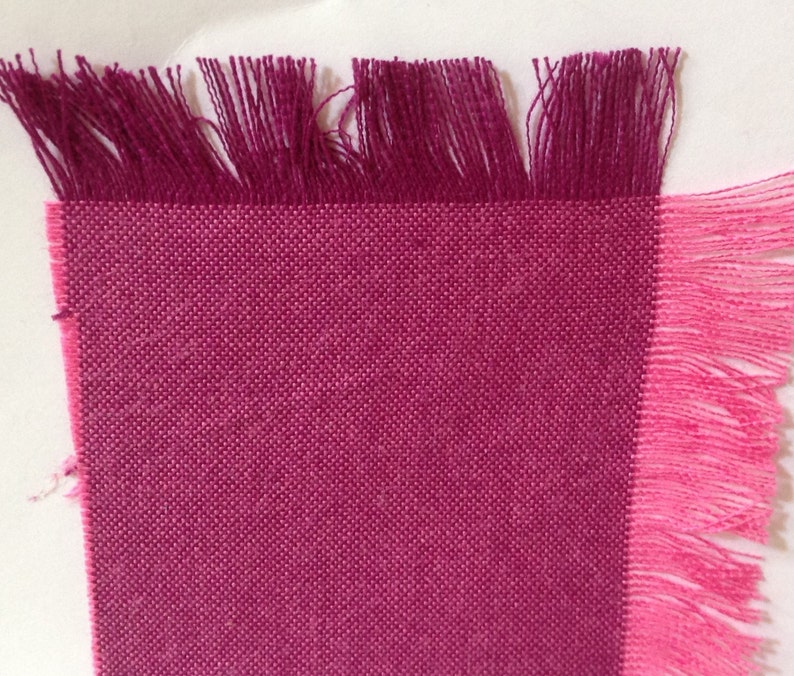
Finally, I came across a line of fabrics called “peppered cottons” by Studio E Fabrics. They’re shot cottons– fabrics with the warp and weft threads in different colors so they change color at different angles– and they came in some lovely shades. I ended up picking “Fuchsia,” which has plum-colored threads in one direction and hot pink in the other.
It works as a nice “bridge” between the cooler-toned squirrel stripe and the warmer-toned velvet. I also used it as the reverse side of the velvet collar and cuffs.
Anyway, once I had the fabric issue resolved, I was able to use my revised pattern to cut out the real bodice– I was able to use my new rotary cutter and cutting mat, which made the process so much faster! In order to get the stripes to be symmetrical I cut out my striped fabric one piece at a time, mirroring the somewhat see-through lining fabric to get the placement just right.
I will note that I made a tactical error in laying out my front bodice pieces– I should’ve taken note of the dart placement to ensure that the darker narrow stripes weren’t going to get swallowed up by the darts. If I’d had the darts take up the wider, lighter areas between the stripes, the design would’ve had a flattering taper at the waist– as it is, the stripes disappear into both darts, leaving a large stripeless area that doesn’t look quite as nice. Sadly, I didn’t realize this until I’d actually assembled the bodice, which made it far too late to fix.
So this is my sketch for my new bustle gown project.
Looks pretty normal, right? But yes, you read the title right– it’s an 1880s Squirrel Dress. A bustle gown made of the most fabulous cotton print I’ve ever seen– at first glance it’s just an abstract floral-ish stripe, but take a closer look, and:
So I’ve finally finished the evening iteration of my convertible gown, and I’m seriously in love with it. It’s so dark and elegant– what with the black-on-black textures of the fabric (moire! velvet! tulle!), the subtly glittery beading, and the velvet bows– and I’m *dying* to wear it somewhere!
Sadly, I may not have the opportunity to do so for a while, nor can I find any appropriately dramatic location for a photo shoot right now, so you’ll have to be satisfied with the picture on the dress form…
I’ll admit now that although I’m posting about this nearly last, it was actually the first thing I worked on– it just took forever to finalize because 1) I was extremely indecisive about the design, and 2) That indecision forced me to place several separate orders for the various widths of ribbon, which took a while to arrive. But I finally figured out what I wanted to do, AND managed to get it done, so here goes!
As you recall, the plan was to stitch lengths of black velvet ribbon down the front of my skirt, with small gaps in the stitching to allow for attachment of ribbon bows when a dressier look was called for.
The first thing I did was go searching for velvet ribbon in various widths– I wanted the bows to be graduated in size, which meant I needed at least four different sizes to work with. After a bit of experimenting with ribbon I had in my stash I determined that the smallest bows would be made of 1.5″ ribbon, so that was a good starting point. I ended up doing my bows out of 1.5″, 2″, 3″, and 4″ ribbon. I also bought some 1″ with my initial order just in case I needed it (spoiler: I did not).
One I had all the structural elements done, it was time to decorate! To add interest to the bodice, I draped some more of my striped netting over the top of the bust and into the armscyes, tacking down pleats asymmetrically for texture. I pinned the netting in place while it was on the dress form, tried it on to ensure I liked it, and hand-stitched it all down, similar to the bodice on my wisteria gown.
For the back I took a slightly different approach– I wanted to hide the closure rather than having the tulle get all bulky from overlapping at center back, so I only tacked down the pleated tulle on the left side of the neckline, leaving the remainder loose. I pleated the loose side down to a short length of black twill tape and added two hooks so I could fasten it at the right shoulder with thread loops.
So remember how for Costume College 2019 I made an 1898 black moiré skirt to wear as part of a Haunted Mansion ensemble? And how I got tons of extra fabric to work with based on the cut of the pattern pieces and a lucky break in my online order? Well, I couldn’t let all that go to waste, so I decided to use it to make some coordinating pieces– first, a formal evening ensemble.
The skirt will be the base, of course, and I’m making a ballgown bodice to go with it. I wanted to make sure that the skirt was both fancy enough to be part of a fabulous evening gown and plain enough to be part of a day outfit; I toyed with the idea of detachable flounces or snap-on appliques before the idea hit me– bows.
Velvet bows, to be exact– bows that can be fitted with small snap-on straps (like lingerie stays in the shoulders of vintage dresses) that slip behind gaps in the stitching of a line of plain velvet ribbon. Without the bows, the skirt will have simple rows of black ribbon down the front, but with the bows it will be dressier and tie in (no pun intended) to the bodice decoration.
I’ve decided to keep the gown completely black and accent the bodice with some black point d’ espirit netting, more velvet ribbon, and some black beaded appliques. This way I’ll be able to wear it with my gigantic rhinestone choker from the My Fair Lady costume and really make things sparkle in contrast.
Rather than buy an entirely new bodice pattern I’m going to adapt the neckline of my Truly Victorian 442 bodice pattern to make it suitable for a later period– it fit me so perfectly it seems a shame not to take advantage of that. I’ll pull up the shoulders and revise the shape of the waistline, which shouldn’t be too difficult, and replace the back lacing with hooks and eyes.
Later on I’m hoping I can make a daytime bodice with leg-of-mutton sleeves, but that’ll depend on whether I have enough leftover moiré. Wish me luck!