Once I’d finished my 1880s Squirrel Dress, I had to have a hat to go with it. I have yet to venture into completely handmade millinery, so I’m always eager to find existing hats that can be adapted to more historical uses. My favorite may always be the Regency Cowboy Hat bonnet, but this one is a close second– I made it from a children’s trilby hat in bright pink.
I was going for something along the lines of the hat in the center here:
Once I’d finished the basic dress, it was time to trim the skirt. Originally I’d planned a double row of wide pleats on the underskirt, with another row of pleats along the bottom edge of the apron overskirt. However, the more I looked at the ensemble the less I liked the idea of all those pleats– they seemed fussy, somehow, and not as tailored and simple as the bodice. It was time to rethink.
I decided to make one wide row of pleats to put along the hem, and to put off further decisions until that was attached. Accordingly, I pieced together a 300″ strip of my fabric (with the stripes oriented horizontally for a fun variation), did a narrow hem on both long edges, got out my homemade pleater board (more on that later), and started pleating. It was really annoying. It took forever. My pleats kept pulling out of the board as I worked, and waiting for the pleats to cool completely before moving on to the next section was extremely tedious. But I suppose it could’ve been a lot worse– I could’ve had to pin them individually before pressing them, right?
With my skirts basically finished, it was time to start work on the bodice. I specifically planned to make it before pleating up my trim for the skirts, since trim can be pieced together and fudged a bit, whereas the bodice needed to be perfect (and stripe-matched). Anyway, I used Truly Victorian 466, the Alexandra Bodice, and I admit that at first glance it looked pretty daunting. So many pieces! Obviously, I started with a mockup.
My first try wasn’t awful, but it needed some work:
The sleeves were too far off the shoulder and I think the back of the bodice was just a touch too long, which made the whole back wrinkle oddly. I took some width out of the shoulders, and shortened the bodice at the shoulder seam because it was loose in the upper chest and back. Plus, once I had all of my skirts on the added bulk at the front required some extra room over the tummy, which I achieved by adding a little extra flare to the bottom of the side pieces. Oh, and the sleeves were far too loose for my arms, so I took out a whole inch of width all the way down the back seam, and shaved off some of the curve at the elbow because it pooched weirdly when my arms were straight. So basically I changed everything. 😉
I was pretty excited to get started on the overskirt for this dress– the draped front and puffiness of the back was what really made the “Bustle Era” look for me. I used Truly Victorian 265, the August Overskirt, and while I did have to fiddle with it before it looked right to me, it turned out great.
I cut out my fabric and stitched up the front panel, then pleated the sides according to the directions and pinned it to my dress form over the underskirt. Immediately I knew I was going to have an issue– the swags just weren’t holding their shape, instead looking rather droopy and making the whole front a lot longer than I’d expected. Before cutting anything off, though, I decided to try a few fixes.
First, I sewed up the underskirt, which is Truly Victorian 261. I did the plain back rather than the bouffant back, since I’ll be putting an overskirt on it anyway.
Like the petticoat, I lengthened the pattern for this one a bit– the finished skirt length was originally supposed to be 40″, and my actual finished length was 43″ including the height of the 1″ waistband. Also like the petticoat, this one came together really easily– it’s just rectangles and slightly shaped trapezoids, and the notches match up to make everything easy.
Because I had extra length from my patterning I ended up making the hem just a little bit deeper than called for– more like 1.5″ instead of 1″ (after the initial 1/2″ turnover). The curved hem of the back panel made the hem a little difficult, but I managed with judicious pinning. For some reason I decided to hand-stitch the hem, even though it’s going to be completely hidden by ruffles later on… I guess this will make it easier to re-hem if it gets dirty or ends up being too short or too long.
No ruffles yet– I want to finish up the main ensemble pieces so I know how much extra fabric I have to make my pleated trim, plus I need to make a pleater board.
Anyway, I’m very happy with it, and I can tell this pattern will make a great base for future bustle dresses. I’m tempted to add a bustle pad on top of the phantom bustle for a little extra oomph, but I’ll have to see how it looks with the overskirt on top before I make any decisions on that.
So this is my sketch for my new bustle gown project.
Looks pretty normal, right? But yes, you read the title right– it’s an 1880s Squirrel Dress. A bustle gown made of the most fabulous cotton print I’ve ever seen– at first glance it’s just an abstract floral-ish stripe, but take a closer look, and:
So one of the issues I noticed when I first tried on my black moiré skirt with a pair of heels was that it was too short.* I’d originally hemmed it to wear with flats and without tons of petticoats (for comfort), but for a glamorous evening gown I wanted to look tall and elegant, and that meant heels, plus a petticoat to fill out the skirt shape. All in all I needed almost another 3″ in length to make the skirt just brush the tops of my shoes.
*Note: This skirt pattern, Truly Victorian 297, is gorgeous but runs a little short in my opinion. I’m 5’6″ and in order to have the skirt long enough to wear with flats I only had 3/4″ left to turn over as a hem (1/4″ and then another 1/2″ for a finished edge). If I were making this again I would lengthen it, and I’d recommend the same to anyone over 5’6″, even if you’re going to wear flats.
Until recently I’d never much cared for the 1830s in terms of fashion– the giant sleeves were off-puttingly wide (unlike 1890s sleeves, which somehow seemed more normal, perhaps because they were higher on the shoulder?) the ankle-length skirts looked awkward, and the giant bonnets were insane. No, I thought, the doll-like silhouette was not for me. But while at Costume College last summer I attended a really fun class on crazy 1830s hair, and then I saw a bunch of attendees walking around in smashing 1830s day dresses, and before I knew it I was hooked!
I picked up Truly Victorian 455, the Romantic Era dress pattern, and started browsing through Pinterest for fabric ideas.
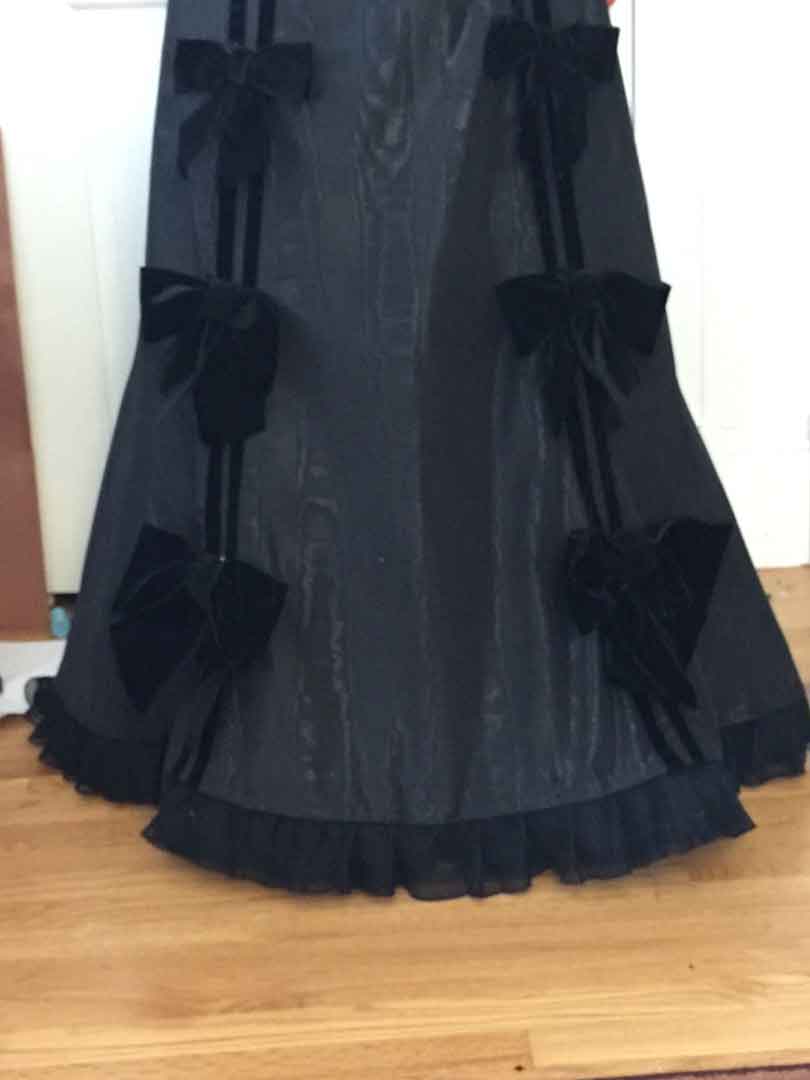
I’ll admit now that although I’m posting about this nearly last, it was actually the first thing I worked on– it just took forever to finalize because 1) I was extremely indecisive about the design, and 2) That indecision forced me to place several separate orders for the various widths of ribbon, which took a while to arrive. But I finally figured out what I wanted to do, AND managed to get it done, so here goes!
As you recall, the plan was to stitch lengths of black velvet ribbon down the front of my skirt, with small gaps in the stitching to allow for attachment of ribbon bows when a dressier look was called for.
The first thing I did was go searching for velvet ribbon in various widths– I wanted the bows to be graduated in size, which meant I needed at least four different sizes to work with. After a bit of experimenting with ribbon I had in my stash I determined that the smallest bows would be made of 1.5″ ribbon, so that was a good starting point. I ended up doing my bows out of 1.5″, 2″, 3″, and 4″ ribbon. I also bought some 1″ with my initial order just in case I needed it (spoiler: I did not).
To make the evening bodice for this outfit, I could’ve bought a whole new pattern but decided (after some conversation with Heather from Truly Victorian at Costume College last year) to modify my Truly Victorian 442 ballgown bodice, which is dated to 1860. I’d used it for my embroidered ballgown before and knew that it fit me well through the torso, so it was a good starting point.
I wanted to lengthen the bodice slightly at the sides to flare out just a bit over the hip, and also change the neckline to bring it up onto the shoulder, because I’d read that an on-shoulder neckline was correct for the period.
I had a whole post written out about how I adjusted the off-shoulder neckline to be on-shoulder instead, then cut out a squared-off neckline to complement the puffed sleeves I had planned– I even made the whole bodice and bound off the neckline, basted in the sleeves, and took pictures for this post!
And then I saw a fashion plate from 1899 with an off-shoulder neckline and instantly started picturing how my gown would look better with a wider shoulder to make my waist look smaller in comparison. I spent an afternoon trying to convince myself that my (already finished) bodice was just fine, but eventually I caved and decided to fix it. In other words, to undo almost all of my pattern modification and hard work. (sigh)