Regency Velvet Capote

velvet-hat-done

To go with my fur-trimmed wrap I needed a hat to wear outside. Unlike all of my other bonnets, however (which are made of straw), this one needed to be winter-appropriate, so I took out my extra velvet fabric and got started.

I picked up a basic cloth-covered sun-hat at Goodwill (brand new, tags still on!), mostly to use its nice, wide brim.

velvet-capote-hat

I wanted the brim to frame my face without being too sunbonnet-y, and I wanted to have a nice big crown with room for a nice hairstyle that wouldn’t get squished. Something like this (apparently it’s called a capote):

I also really like the ruching on this bonnet from the 1995 Pride and Prejudice:

Image result for scottish beret female 1820

Continue reading

Regency Pashmina Dress, Part I: Design and Fabric

A few months ago I was invited to join a friend at the The Governor’s House in Hyde Park, Vermont for a Sense and Sensibility Weekend, which is basically a weekend of Jane Austen-y activities at a historic house (built in 1895 but it’s a copy of a 1753 home), including tea, a dinner dance, and a sleigh ride! It sounded like fun, but I immediately knew that I would need to supplement my Regency wardrobe, which until now has consisted solely of evening gowns and springtime-appropriate daywear. Clearly, I needed something for winter!

I wanted to use a more winter-appropriate fabric than my usual cotton, not only for warmth but also because I just thought something more textured would look better in the setting. The problem was, it was difficult to find lightweight wool in a pretty color at any price point, much less one that I was willing to pay. But then it occurred to me– what if I made my gown out of pashmina shawls? After all, making gowns out of such shawls is actually completely accurate to the period, as textiles from the Indian colonies were hugely popular during the Regency.

Josephine Tasher de la Pagerie, Empress of France - Baron Antoine Jean Gros circa 1808. Oil on canvas. Musee d'Art et d'Histoire, Palais Massena, Nice, France.Photograph of French dress of red net with high waist, puff sleeves, and Kashmir-inspired motif at the hem, in the posession of the Musée Historique de Tissu de Lyon coiffure à la Ninon - robe de cachemire  journal des Dames et des Modes 1809

Continue reading

1860s Embroidered Ballgown, Part VI: Finishing the Bodice

ivory bodice fixed

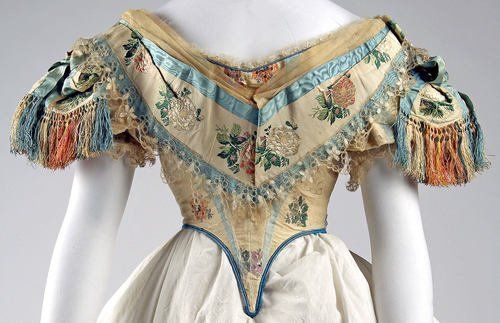
So as you recall, I had some issues with the seams rippling in my bodice— I wasn’t sure what was causing it, but after some consultation with other costumers online we determined that it was likely due to the bodice being too long. The extra length was being pushed up and forwards by the curve of my skirt, causing the seams to buckle.

ivory-bodice

One way to remedy this issue is to fix the shape of the bottom of the bodice– since the original pattern hadn’t provided a stitching line or directions for how to shape it, I’d just done a basic pointed bodice, front and back. However, closer examination of the fashion plates and extant gowns showed that pointed bodices back then had an entirely different shape– much more curved, with a distinctly long front point when compared to the rest of the bodice. This allows the skirt more room to bell out without pushing out the bodice edges.

41fc91c68357184169d0d4baa662b3e5

I removed my piping and adjusted the shaping of my bodice hem to get it closer to that high arch on each side of center front– I couldn’t make it nearly as extreme as the example above, but I think it’s a little better– besides, not all period gowns had the extreme arch shape anyway.

Continue reading

1915 Picnic Dress, Part IV: Embroidered Appliqués

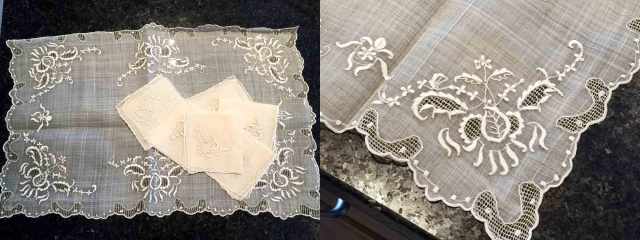
Once the dress was put together, it was time to do the embellishments. As you recall, I found this beautiful centerpiece/napkin set to use for my dress accents.

picnic-dress-placemat

It arrived looking a bit dingy (as many antique linens do) so I soaked it in diluted Woolite for a bit (testing it first on one of the cocktail napkins to be sure it wouldn’t ruin anything) to whiten it up. It only brightened a little, so I tried Oxiclean. That also brightened it a tiny bit, but finally a 2-minute soak in a Clorox solution (followed by a rinse in diluted hydrogen peroxide to neutralize the excess chlorine, and several rinses in clean water) did the trick to make it a nice antique white.

I will also note that while I’d originally assumed that the embroidery was done by machine, now I’m not so sure. On closer inspection there are actually significant differences between each of the corners in terms of placement and missing/different stitches, which implies that the embroidery was hand-done after all. I wish I had a better idea of the date on this set, but in any case I think it’s lovely. It’s almost a shame to cut it up, but I’d never use it as-is.

Continue reading

1915 Picnic Dress, Part III: Skirt

As you recall from my sketch, the skirt has several layers to it– an overskirt, an underskirt, and an apron-ish panel in front. When I decided to make this outfit into a dress, I originally planned on stitching all of the layers to a single waistband to ensure that they’d all stay properly aligned. However, after getting most of the way through the process I decided that the weight of the underskirt was pulling everything down too much, so I ended up making it separate from the overdress. The whole process was a serious pain…

For the underskirt I first just cut a single rectangle about 2 yards long and ran two horizontal decorative tucks at the hem. I made them deeper than my sleeve tucks– about 1″. I’d originally planned on doing three tucks to mimic the sleeves, but I had some issues with placement and ended up with only two. I used a folded sheet of paper as a guide to keep the width consistent.

picnic-skirt-tucks

I stitched up the back seam after sewing the tucks, and used the selvedges for the top and bottom of the skirt, hemming the skirt to the correct above-the-ankle length. Happily, my mistake with the spacing of my tucks turned out all right, because turning up my hem twice made it just about the depth of the tucks, which looked intentional.

picnic-hem

Continue reading

1915 Picnic Dress, Part II: Bodice

I had originally planned on making this a two-piece dress with a separate blouse and skirt, but then realized that my fabric was so sheer that it would clearly show the tucked-in blouse through the skirt, making the whole thing look weird. I decided instead to turn it into a dress and add a closure to the side front. The layered design of the skirt would help with this, since it would disguise the closure once it went past the bodice.

I started with Truly Victorian’s TVE45, the 1911 Narrow Panel Blouse, cutting out a mockup just to see how it would fit. To my surprise, it did not go well.

TVE45 - 1911 Narrow Panel Blouse

The pattern is so basic– two T-shaped side panels connected by a front and back– that I’d assumed it would go together easily and without much trouble. Well, it went together easily, but the fit was all off. The front panel was far too low on the chest, and the kimono sleeves pulled the already slightly-angled neckline even more towards the sides of the shoulders, causing unsightly pulling across the bust and skewing the neck opening. The sleeves were also too baggy, which is probably a matter of preferences vs. a flaw in the pattern, but which still had to be adjusted.

I endeavored to fix things first by altering the shape of the front and back panels to be wider and less angled. I like the angled look in general, but here it was not only causing the above-mentioned fit issues, but also reducing the amount of visible space available for my lace bodice insert, which I’d intended to show off. Making the panels wider gave me more space, and making the sides straighter kept the neckline stable. I also raised both panels up several inches– the front for modesty’s sake and the back to keep the neckline where it belonged.

Continue reading

1915 Picnic Dress, Part I: Fabric and Sketch

So this is my third year organizing a Historical Costumers’ Picnic, and in honor of the event I’m going to make something new to wear (as I do every year). Since I’ve got a bunch of other projects going on for Costume College I decided that this one should be relatively simple– no complicated fitting issues, no elaborate handmade trims or fastenings, no insane underpinnings. So the Victorian era was out, of course, as was the very early Edwardian period. I already had a 1920s summer dress from last year, so this time I opted to go a few years earlier, when the dresses were starting to get lighter, airier, and shorter (just hitting the ankle) but still had natural waistlines and relatively slim skirts. 1915 seemed about right from the fashion plates and extant gowns:


So here’s my sketch:

picnic-dress-sketch

Continue reading

1882 Tea Gown, Part II: Mockups and Pattern Alterations

With all the pattern alterations I’d be making to TV432, I knew I’d have to make at least one mockup, likely several. Since I don’t have a ton of experience altering patterns so drastically, I decided to cut a mockup from the straight pattern just to see how it fit. Oddly, the size according to my measurements ended up being too small, so I cut the front two sizes bigger to give myself tons of room, marked (but did not stitch) the darts, and then tried on the mockup so I could pinch darts and seamlines to fit.

I determined (like the Modern Mantua Maker) that the best way to incorporate my center front panel was to morph the darts into princess seams, one of which would form the closure of the gown. I basically put the mockup on, pinned the center front closed, and pinched in princess seams on either side. You may be able to see that I tried two (very slightly different) options for the shape of the curve– I ended up going with the one on the left. There are also single darts to the outside of the seams, for better fit.

teagown-mockup-1

I will note that while the original center front line was shaped to allow the two pieces to be sewn together for a nicely curved bustline, I pinned the center front down a straight line so I could cut the center panel as a single piece later on. I’m small-busted enough that this didn’t cause any issues, but if you’re well-endowed you may want to keep the center front panel as two pieces so you can sew in that curved bustline. As long as you add an overlay to cover the seam it won’t matter.

Continue reading

1882 Tea Gown, Part I: Fabric and Sketch

I can’t remember where I got the idea, but I’ve been wanting a Victorian tea gown for a while now. What’s a tea gown? It started off as a casual morning wrapper to be worn for informal at-home occasions, and then apparently got more stylized and formalized over time until it became a whole new mode of dress– still for wearing at home, but no longer something it was unacceptable to be seen in by visitors. Jennifer Rosbrugh has a nice history of them here, and The Dreamstress has another excellent explanation here.

Anyway, I loved the concept, and after a little bit more research I decided to base my own tea gown on Truly Victorian 432. It looks relatively straightforward, and has Watteau pleats in the back (shades of a robe a la francaise!) that I love the look of.

While I was in Los Angeles last year I saw some gorgeous embroidered fabric for $2.95/yard (!) that I just had to snap up– at the time I’d had a vague notion of making this project but wasn’t sure what exactly I wanted to do with it, so I got 8 yards of embroidered fabric, plus another two yards of coordinating sea-green dupioni and an extra yard of pinky-bronze taffeta to match the embroidered flowers. Plus several yards of coordinating trim, because it was on massive sale  at $0.99/yard! I figured that would be enough for anything.  Behold, my collection!

tea-gown-fabric

I’m fairly sure it’s all polyester/acetate, but it’s so darned beautiful and I’ll line it with cotton, at least, so that’s something, right?

Continue reading

Regency Ivory Gown, Refreshed

I recently attended a Regency ball, which is usually my excuse to make something new and pretty to wear. However, as I’d just finished cleaning out my closet I couldn’t really justify making a brand-new gown (also, no time), so I decided to freshen up an old one– my ivory sheer ballgown, originally worn under a burgundy open robe made of a vintage dupatta.

regency-open-robe-2 regency-sheer-done

I’d worn the burgundy open robe a few times already, but without it the ivory gown just seemed too plain. I dug through my stash and pulled out a vintage chiffon dupatta in forest green, leftover from when I was collecting fabric for my 1920s green evening dress.

Continue reading