I know it’s not plum season anymore, but back in September I bought some late summer plums, ate a few (they were too sour) and promptly forgot about them. Of course, by the time I remembered them, the were not only plenty ripe, but even overripe– not prime eating material. What to do? Bake!
I found a simple cake recipe online that didn’t require softened butter– always a plus in my opinion– and which set off the plum flavor with almond and lemon, which I thought would make a nice combination. The cake came together easily, and baked up nicely. It was somewhat breakfast-y, in that it was kind of rustic and reminded me of a coffee cake. It made for a nice bake for a fall afternoon, though it was homely enough that I don’t think I’d break it out for company (though that may just be my personal standards). Definitely good for breakfast (maybe topped with some vanilla yogurt), an afternoon snack (with a cup of hot tea), or dessert (ice cream, all the way!).
Is there anything more representative of fall than a fresh apple cider donut? Usually we get our apple cider donut fix when we go apple picking or when we stop by the local farm store to get pumpkins to carve for Halloween, but this year I decided to break out the mini donut maker and make my own!
These apple cider donuts are made with reduced apple cider (for more concentrated flavor), plus an array of warming spices and brown sugar. The just-baked donuts (which are nice and tender) are dipped in melted butter and immediately rolled in a sugar-spice mixture for that signature sugary crust on the outside, that really makes the dessert. Plus, smaller donut = larger surface area, which in this case is a very, very good thing!
The great thing about this mini donut maker is that it bakes the donuts in just under 90 seconds, which makes the baking process go by really quickly– in fact, I had just enough time to remove the baked donuts, pipe new batter, then dip and dredge each new donut before it was time to start all over again. A piping bag makes the process so much easier– really a crucial tool here, along with a skewer to nudge the donuts out of the machine when they’re done (without scratching the nonstick surface).
Definitely try making these the next time you’re in the mood for the freshly-baked taste of fall!
It’s spooky season! As you may recall, I enjoy making fun Halloween treats, especially when there are parties I can bring them to. While I don’t have any particularly fancy Halloween plans this year, that doesn’t mean I can’t have a little fun with themed desserts– and this one is totally worth the effort!
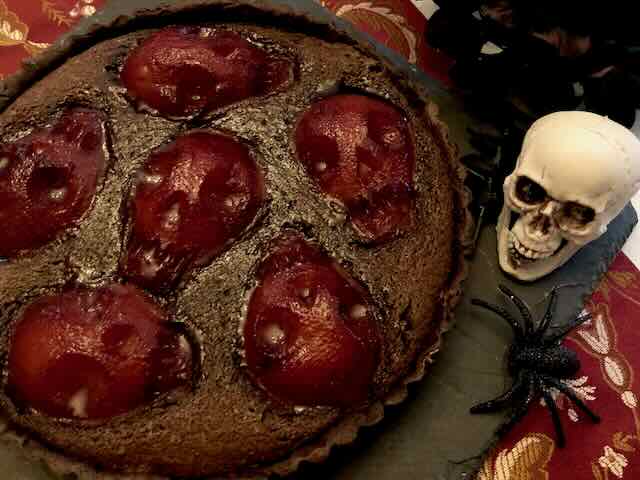
I admit that I shamelessly lifted the idea (at least visually) from this Grim Reaper Galette from Ghoul At Heart, but since I didn’t have an entire bottle of Chambord to soak my pears in, and because I love the combination of pears and almonds, I decided to go in a different direction for the details. This tart uses a chocolate pate sucree, filled with chocolate frangipane and red wine-poached pear skulls. (Note: since I had extra ingredients I made some mini tartlets and spread some raspberry jam into the bottom of the crust before filling them– a tasty variation!)
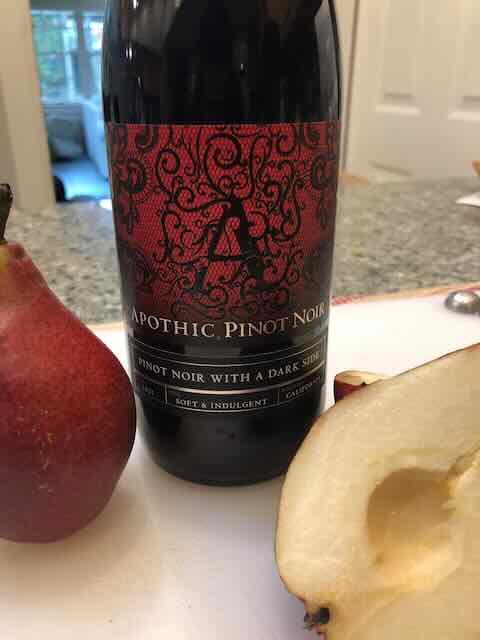
The skulls were surprisingly easy to make– I used red D’Anjou pears, on the firm side to ensure that they didn’t fall apart, peeled, halved, and cored. I used a 1/4 tsp. measuring spoon to scoop out the eyes, and the tip of a paring knife to cut the nose and teeth. I poached the pears in a bottle of (cheap) red wine with an entertainingly goth-y label– you really don’t need to get the good stuff, since you’re pouring in sugar anyway! I will note that the pears don’t look all that red while in the wine bath (which worried me– I really wanted the color to pop), but once you take them out the color really comes through. And once they’re baked, they get even darker.
The finished tart was gothically gorgeous, not to mention delicious! The tart crust is almost cookie-like, while the frangipane filling is like a gooey brownie surrounding the boozy pears. Drizzled with a little red wine syrup (disturbingly blood-like), this dessert will be a fabulous finish to any Halloween dinner party!
I will note that there’s a decent amount of down time for this tart– your butter has to come to room temperature for the crust and frangipane, the crust needs time to rest and chill before rolling out, then more time to chill before baking. Then you need to blind bake and cool it the shell, and your poached pears need to be thoroughly chilled before assembling and baking the final tart. I split the work over two days, making my tart dough and pear skulls the night before and wrapping them in plastic to chill overnight, then making the frangipane and baking the tart the next day. If you want to serve this in the evening, get started in the morning to make sure everything is ready.
Every time I have tiramisu at a restaurant, I end up thinking to myself, “Why don’t I make tiramisu more often?” And then I go home and forget about it until the next time, mostly because I never have an excuse to make it in the meantime. Well, this week I was in luck, because we had a bake sale at work and I finally had a reason to bake something impressive! Cupcakes, by preference, since they’re easy to transport and sell in single servings.
I started with a basic vanilla cake, brushed with an espresso-rum mixture to evoke the flavors of classic tiramisu. Then it was time for the filling/frosting. I originally tried a whipped mascarpone recipe that called for equal volumes of mascarpone and whipping cream, whipped with powdered sugar. Unfortunately, in refused to stiffen up, and when I kept whipping it just curdled into a grainy, soupy mess. I was going to throw it away, but it occurred to me that if the cream had curdled into butter, then I could just drain off the liquid and treat it like butter! I poured off as much liquid as I could (there was a lot), then chucked in some additional powdered sugar and started whipping it up again… and it worked! That being said, since I don’t want anyone to have to rescue a frosting disaster I’ve included an adjusted frosting recipe here, which is basically a cream cheese frosting that uses mascarpone instead of cream cheese. It’s got a fresh, milky flavor you can only get with real mascarpone, and I definitely recommend it.
To really hammer home the tiramisu theme, I dusted the tops of the cupcakes with cocoa powder and garnished them with a ladyfinger cookie.
Now you know I adore macarons– delicate, chewy little cookies sandwiched with delectable, creamy fillings, ready to be tinted, sprinkled, or otherwise decorated to match your fabulous tea party. Sadly, one of my friends is allergic to tree nuts and so has thus far been unable to appreciate them as they deserve.
Well, no more! I had an extra six egg whites and was determined to crack the code for nut-free macarons!
Some online research yielded two main contenders for almond flour substitutes– oat flour and pumpkin seed flour. I’ll tell you right now that I did not like the oat flour macarons at all– they had a weird, gritty texture (like raw oats) and the flavor was off-putting. I would not recommend them, but if you’re going to try the recipe, be careful with the “folding in the dry ingredients” step– it takes much less stirring to reach the batter stage.
The pumpkin seed flour, on the other hand, behaved exactly like almond meal in my standard macaron recipe, with the exception of being slightly darker in color. Rather like unblanched almond meal, it had little brown specks in it, and without food coloring I’m betting that the macarons would be a pale, pale green. That being said, the macarons spread nicely, had cute little feet, and tasted almost identical to almond macarons!
I filled them with chocolate ganache and salted butter caramel, and proudly presented them to my friend with the allergies, who had never before been able to have macarons and was happy for the opportunity.
I would definitely make these again for my next nut-free event. They’re no more trouble than almond macarons, and just as delicious!
I decided the other day that I was going to bake something– not an uncommon occurrence, but this time I had a specific reason: to welcome new neighbors. The problem was, it was the middle of the week, which foreclosed the possibility of shopping for specialty ingredients, and I had to be careful to keep the recipe generally inoffensive. No nuts, in case of allergies. No really unusual spices or flavors (which foreclosed my peanut butter chili crisp cookies as an option). And they had to look at least marginally appetizing, since I couldn’t rely on my reputation for tasty baked goods to encourage people to try them.
I found a jar of raspberry jam in the pantry and decided to make thumbprint cookies– chocolate ones, since raspberry and chocolate is a fantastic combination. I did some digging into various chocolate thumbprint recipes, many of which seemed rather short on chocolate flavor, and finally found one with some unusual-seeming proportions, but which looked interesting. There’s relatively little butter, but the addition of melted chocolate makes up for it while adding a nice dose of chocolate flavor. While the dough starts off soft (and therefore requires thorough chilling before use), it shapes up nicely when cold and doesn’t crack too much when gently flattened onto the cookie sheet.
The finished cookies were really delicious– the cookie base was soft and tender, the jam added the perfect bit of tanginess and interest, and the chocolate garnish was a nice finishing tough. I will definitely add these to my recipe box!
Okay, I’m going to admit at the outset that I did not use golden syrup for this cake. What I did use was a double batch of maple syrup that I had spent two days trying to turn into maple cream, without success, resulting in my endless frustration, a blister on my stirring hand, and my firm belief that the maple syrup had somehow managed to convert too many of its sugars into invert sugar, thus preventing the crystallization that is crucial for the formation of maple cream. In any event, as I appeared to have a good four cups of invert syrup on my hands and no hope of maple cream, I couldn’t let it go to waste, could I? Of course not. So I made cake.
Two loaves of cake, actually, using a whopping 400g of syrup (plus more for glazing), which neatly used up the excess I had on hand. The recipe couldn’t be easier– you melt your syrup with additional sugar and butter, then beat in eggs, milk, and self-raising flour (I substituted regular flour with leaveners added), and there’s your cake batter, ready to bake!
I will note that my leavening ratio may have been a bit off– my cakes both sank in the center, which is often a sign of too much leavening (rises before it has a chance to firm up, then sinks back down)– or possibly it could’ve used a slightly hotter oven. Or maybe my inverted maple syrup had a different water content than true golden syrup. But the cakes themselves were moist and plushy, with a sticky sweetness that made it easy to try just a tiny bit more every time I passed them sitting on the counter,
It feels like everyone’s using chili crisp these days– the spicy, crunchy, garlicky condiment goes well with all different kinds of cuisines, adding punch to soups, sandwiches, pastas, and basically any other savory dish. But what about sweets? That’s what I asked myself when I spied some chili crisp peanut butter cookies in a Korean bakery the other day– could it really work?
Being, well, me, I opted not to buy a cookie, but to make one. Ever-so-slightly adapting a recipe from Zoe Kanan, I ended up with these– they’re soft, with slightly crisp edges (I may have underbaked mine, but better under than over), with a complex flavor profile that combines spice, umami, and the unmistakable echo of garlic that comes from the chili crisp. It totally works, though I’m glad I followed the instructions and made the cookies on the small side. I don’t think you’d want to eat a dozen of these in a sitting, but they are definitely interesting, tasty, and will earn you some points for creativity at your next cookie swap!
So, having made (and loved) my carrot cake jam, it was time to make macarons! They turned out absolutely delicious– the macaron shell was just “cakey” enough to really evoke carrot cake, with the almonds lending a nutty background. The filling combination– carrot jam and cream cheese frosting– was perfectly sweet and tangy at the same time. I know I say this a lot, but these may be a new favorite macaron recipe!
Going out for dim sum as a kid, we would always get egg tarts for dessert. They were my dad’s favorite, and since they came three to a plate I would sometimes split one just for the sake of having something sweet to finish off the meal. Back then I leaned more towards chocolate desserts, but as I’ve grown up my tastes have gotten more diverse, and I’ve learned to appreciate a flaky crust filled with smooth, silken custard– and I’m betting that if my dad ever gets to taste these, he’ll like them even better than the ones in the restaurant.
I admit that making a fully-laminated dough for the crust is a bit labor-intensive– certainly more so than simply making a flaky pie crust or a melted-butter tart crust– but the crust is one of the distinctive elements that makes these tarts a classic.
I actually made two different crust recipes, just to see which one I liked better, and while I’m only 95% sure that I noted the correct recipe to use here (oops!) they were both pretty tasty, so I’m comfortable giving you this one. It was a little tough to roll out but the flaky layers were perfectly crispy.
I used foil tart pans (these were perfectly sized), but you could probably use a regular muffin pan if you were so inclined. There’s enough butter in the dough that I wouldn’t worry too much about sticking.