1898 Black Moire Convertible Gown, Part VII: Evening Version Finished!

moire-gown-full

So I’ve finally finished the evening iteration of my convertible gown, and I’m seriously in love with it. It’s so dark and elegant– what with the black-on-black textures of the fabric (moire! velvet! tulle!), the subtly glittery beading, and the velvet bows– and I’m *dying* to wear it somewhere!

Sadly, I may not have the opportunity to do so for a while, nor can I find any appropriately dramatic location for a photo shoot right now, so you’ll have to be satisfied with the picture on the dress form…

1830s Butter Yellow Day Dress, Part I: Sketch and Fabrics

Until recently I’d never much cared for the 1830s in terms of fashion– the giant sleeves were off-puttingly wide (unlike 1890s sleeves, which somehow seemed more normal, perhaps because they were higher on the shoulder?) the ankle-length skirts looked awkward, and the giant bonnets were insane. No, I thought, the doll-like silhouette was not for me. But while at Costume College last summer I attended a really fun class on crazy 1830s hair, and then I saw a bunch of attendees walking around in smashing 1830s day dresses, and before I knew it I was hooked!

I picked up Truly Victorian 455, the Romantic Era dress pattern, and started browsing through Pinterest for fabric ideas.

Image result for truly victorian 455 review

Continue reading

1898 Black MoirĂ© Convertible Gown, Part IV: Bodice Embellishment

moire-bodice-done

One I had all the structural elements done, it was time to decorate! To add interest to the bodice, I draped some more of my striped netting over the top of the bust and into the armscyes, tacking down pleats asymmetrically for texture. I pinned the netting in place while it was on the dress form, tried it on to ensure I liked it, and hand-stitched it all down, similar to the bodice on my wisteria gown.

moire-bodice-net

For the back I took a slightly different approach– I wanted to hide the closure rather than having the tulle get all bulky from overlapping at center back, so I only tacked down the pleated tulle on the left side of the neckline, leaving the remainder loose. I pleated the loose side down to a short length of black twill tape and added two hooks so I could fasten it at the right shoulder with thread loops.

moire-bodice-back

Continue reading

1898 Black MoirĂ© Convertible Gown, Part III: Sleeves

Up next were sleeves. I wanted them to be puffed, to broaden the shoulder line, balance out the skirt, and make the waist look smaller by comparison. Before I changed my neckline back to off-shoulder I originally took my inspiration from the famous Worth ironwork gown– its sleeves are made of gathered tulle with velvet bows, and I thought they’d go well with the bows on my design.

Beautiful House of Worth 1898-1900 Black & White gown...

I ordered some black tulle with tiny stripes and spots on it to make my sleeves– I liked the subtle texture of the pattern, as opposed to plain black.

Continue reading

Lady Macbeth Beetlewing Gown, Part IX: Sleeves

Let me just say, this step took FOREVER because of all the embroidery, but I’m finally done! And now the dress is technically wearable and actually looks like THE DRESS (though still not finished)! I love it when that happens…

As I discussed in my patterning post, the sleeves are cut with the long edge at the shoulder and hang almost to the floor. That being said, I’m pretty sure that Sargent took some artistic license with his painting (he totally did; Ellen Terry was *not* as tall as he made her in the painting), because even with my sleeves cut down to a mere inch above the ground, they still weren’t as long as they look in the painting when I raised my arms. More like mid-thigh length, rather than below the knee.

One thing about the sleeves always bugged me (no pun intended): is the trim on the outside or the inside? The Sargent painting pretty clearly shows it on the outside, since you can see both the outer sleeve and its (plain) lining.

Ellen Terry as Lady Macbeth 1889 by John Singer Sargent 1856-1925

But there are definitely images of the dress showing the trim with both options.

f108e73d41cded893964b9c8c67d765a
Inside
d5825a0931a862530dba0738e8ca40e9
Outside

Since the trim is curved, it can’t just be folded over and still lie smoothly, so it has to be one or the other.

After consulting with fellow costumers online I came to the conclusion that the dress in its original form had the trim on the outside, but that at some point during its history the trim must have been folded to the inside, with tiny darts taken to keep it smooth. Then, when the dress was restored they put it back in its original condition with the trim on the outside where it belonged. Mystery solved!

Anyway, as you recall I’d originally planned to use pre-embroidered trim cut from a vintage sari. However, the more I looked at it the more I was dissatisfied with this plan– the trim was too elaborate, it wasn’t curved so would need some work to fit the sleeve, and the background color was a different green than my lining fabric, which didn’t look right. I decided instead to switch gears and embroider the trim myself on extra green cotton gauze. Why do I always do this? I have no idea.

Continue reading

Lady Macbeth Beetlewing Gown, Part VIII: Skirt

More progress! These posts are getting farther apart due to the complexity of each step, but I promise that we’re nearing the light at the end of the tunnel!

As I mentioned in my patterning/mockup post, the underskirt was a simple A-line, but the overskirt was drafted differently for the front and back. The front was an A-line, while the back was a half-circle, both with gathers at the waistline for extra fullness.

I’d originally planned on attaching the skirt directly to a separate waistband at the natural waist, to let the weight of the skirt rest there rather than dragging down the bodice. However, because the bodice had a dropped waistline and was fitted to the hips there wasn’t room for all those fabric gathers between the natural waist and the dropped waistline. Instead, I made a fitted yoke out of cotton sateen (dyed in the same bath as my cotton gauze) that was set on a waistband.

Continue reading

Lady Macbeth Beetlewing Gown, Part IV: Cutting

Once I had my mockup, it was time to cut into my actual fabrics. Unfortunately, this was easier said than done. Due to the differing stretch of the fabrics along the vertical and horizontal axes I had to be careful to cut my pattern pieces in specific directions, which (given the size of some of my pieces) was tough and didn’t always allow me to maximize my use of the fabric’s area. Since my bodice pieces were the smallest of all, I resigned myself to fitting them in around the larger, more oddly-shaped pieces, which I cut out first.

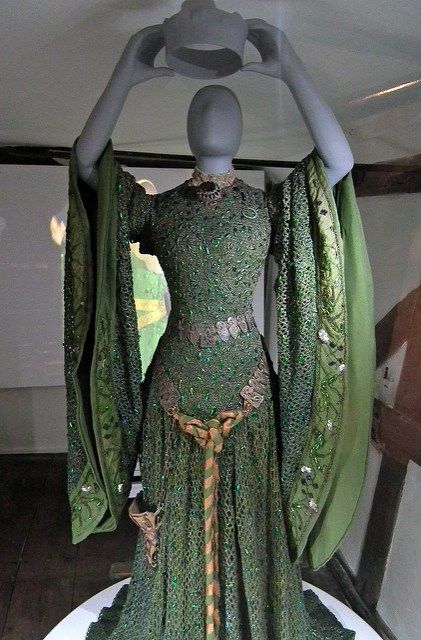
I had 6 yards of my kelly green gauze (42″ wide after shrinking), and 7 yards of my dark green crochet lace (54″ wide). Sadly, while I ended up having just* enough crochet lace to cut out my dress (with judicious piecing of the two center back bodice panels), I did not have enough gauze to make my underskirt. After cutting the gigantic sleeves out there just wasn’t enough fabric to make the skirt flare properly, and since I’d decided in the interim to change my plans for the sleeve trim I needed extra for that as well. I’ve ordered more fabric to re-cut the underskirt and do the sleeve trim (4 yards to be extra safe) and I’ll have to try to dye it to match, which will be incredibly annoying, but not as annoying as if I’d had to match the crochet lace color. At least any slight color difference will be less obvious since it’ll be somewhat hidden by the extra folds of the overskirt.

That being said, I did manage to cut out everything from my crochet lace, and since I’d never worked with a full lace overlay before, much less fabric as weird as this one, I was a bit concerned that things could get ugly. I decided to take some precautions, underlining every single piece with tulle to minimize the lace pulling out of shape, and basting everything together as I went.

I cut my lining pieces first from the cotton gauze, and then laid out my crochet lace face down on the carpeted floor (the carpet really helped keep the fabric from slipping out of alignment), smoothing a layer of pale green tulle over it. Then I set my lining pieces on top of both layers of fabric and pinned them in place through all layers before cutting around them. Once they were cut I hand-basted around each piece to keep things from shifting.

beetlewing-layers

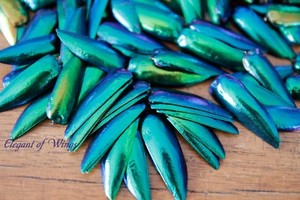
For the bodice, I basted through all three layers since I’ll be assembling the panels into a bodice before adding the beetlewings– I haven’t decided yet whether I’ll try to stitch the wings just to the top two layers, or go through all three, but either way the pieces are small enough that I can work with the bodice as a single piece without too much trouble. For the sleeves and skirt, however, I’ll be adding the wings before assembly, so I need to keep the lining pieces separate.

* FYI, here’s a photo of all of my scraps from the crochet lace. This is out of a full seven yards of 54″ wide fabric– when I say I had “just enough,” I mean it!

beetlewing-scraps


Lady Macbeth Beetlewing Gown, Part II: Supplies

So the most important part of this gown is clearly the beetlewings (technically elytra, or wing casings, but “beetlewings” is easier to understand). Luckily for me, elytra from sternocera aequisignata (the species of jewel beetle most commonly used for decoration) are readily available for sale on eBay at very reasonable prices. The original gown is said to have had 1,000 wings on it, but just to be safe I ordered 2,000– it wouldn’t do to run out and have to order more from Thailand, after all! I thought about purchasing them pre-drilled with holes at the top, but decided that if I was going to have to clip them to size and put additional holes in for sewing anyway, I might as well save a little money and get them undrilled.

Image result for beetle elytra

Continue reading

Regency Pashmina Dress, Part III: Sleeves

pashmina-sleeves.jpg

To add some interest to the design of an otherwise relatively plain dress, I decided to add a small puff to the top of my long, straight sleeves. Not only that, but I wanted to ruch the puff to give it even more texture and dimension.

I wanted to use existing patterns for long sleeves and puffed sleeves– the problem was, my sleeve patterns are completely different shapes. As in, my puffed sleeve pattern is symmetrical and my long sleeve pattern is cut so that the seam is set towards the back. I decided that rather than try to convert my puffed sleeve pattern, I would use it anyway and rely on the fact that the whole thing is going to be too short for the difference in seam placement to matter.

Continue reading

1860s Embroidered Ballgown, Part V: Bertha

So it’s time to make the bertha (weird name for an article of clothing, but whatever). Berthas can be made of flat or pleated/gathered pieces of fabric, trimmed in any number of different ways. TV442 comes with two options– a flat one and a gathered one.

tv442-01

I decided to make the gathered bertha, which was really just a long, hemmed rectangle with angled lines of gathering to form the ruffles. I figured that I’d cover up my gathering lines with some blue and gold trim to add some visual interest. Accordingly, I cut out the fabric, ran gathering stitches along the appropriate lines, and started pinning things to see how it would look.

Unfortunately, it ended up looking like this (ribbon is tacked down as a placeholder only, but you get the idea). Ugh.

bertha-ruffled

Continue reading