

Okay, so I already made one Regency bonnet out of a standard straw hat. That was easy. But for my second bonnet i wanted to be more of a purist and go with all straw, rather than a fabric crown. And I wanted it to be visually different from the first bonnet, with a more open, delicate look that would go with the light, airy cotton dress I would be wearing it with. Unfortunately, I wasn’t able to find any inexpensive straw hats that had the more open weave– that is, until I came across this cowboy hat.

I found it on eBay but it’s also available on Amazon (though more expensive there). As soon as I saw it, I knew that it would be perfect to make a lacy-looking straw bonnet. I was a little worried about the brown painted edge accents, but knew I could always paint over them. And after reading some tutorials online about how to re-block straw hats, I figured that the weird crown shaping would be no problem, so I ordered it and got started!
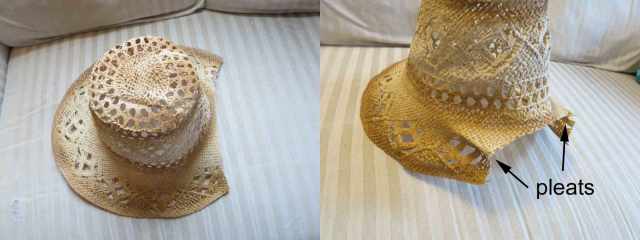
Here’s the hat upon arrival– it looks just like the picture, which is a good thing. I was worried the brown paint would be too dark to handle.

First I pulled the hot-glued decorative band off of the outside, and then used a seam ripper to remove the inner sweatband.

I flattened the brim (it was wired, so it stayed in place easily), then I got out my largest bowl and filled it with warm water– probably about the temperature of a hot shower. I settled the top of the hat into the water and waited about a minute, then started pulling and stretching the crown, still underwater, to work out the triangle-shaped pinch pattern.
That worked pretty well on its own, especially on the sides, but there was still some bulging at the very top. I got out a metal kitchen canister and used it as a hat form, pulling the hat down over it and pressing the top of the hat to the flat lid to mold it into shape. This helped to 1) flatten out any remaining bulges or dents on the top of the hat, and 2) lengthen the crown itself. The open weave pattern was very helpful here, since it allowed for a lot of flexibility in the shape of the hat.
To weigh things down so the top stayed flat, I overturned an 8-cup Pyrex measuring cup on top of the hat, still on its mold. Then I let the whole thing sit overnight to dry, after which it was still a little damp so I removed the measuring cup and hit it with the hair dryer to really firm it up.


Once the crown had been flattened and stretched, I did another round of shaping to fix the brim. I cut off the back of the brim at the nape of the neck, then ladled more warm water over the front and sides of the brim, concentrating on the area where the hatband used to be to really soften it up. Then I pulled the brim forward, trying to flatten the angle between the crown and the brim to make it more of a poke-bonnet shape. Honestly, that took some work, because I didn’t have a form to mold it over. In the end I sewed down two pleats near the sides of the neck to bring in the brim and make it more of a bonnet shape.
I still had some rough spots where I’d cut the straw, so I smoothed them over with a bead of hot glue. Then I mixed up some buff-colored paint to cover up the brown markings on the crown (hard to tell in the pics, but it’s a big difference), and the glue. I decided to leave the brown coloring on the brim since it added some dimension to the finished bonnet.

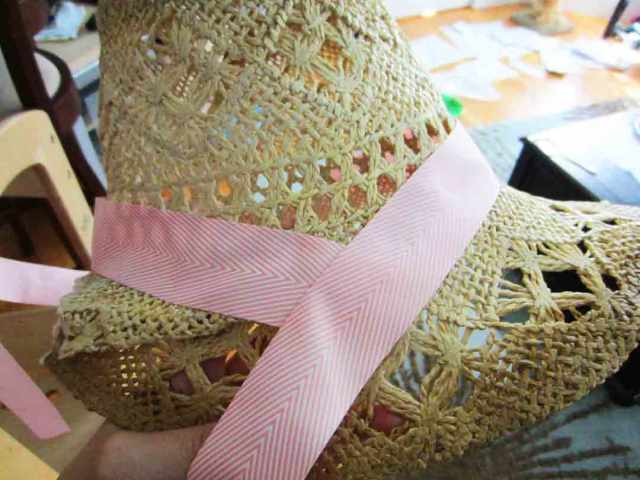
I wanted this bonnet to be more casual in style than my original bonnet, so I decided to decorate it with just ribbon, no silk flowers or feathers or anything. I found some chevron-striped ribbon that I thought would go well with the stripes on my cotton sari dress, and attached it to the bonnet in two sections– one to go across the front and to act as ribbon ties, and one to fill in the space in the back. I needed to do this because the crown was so tapered that the ribbon wouldn’t lie flat when I tried to wrap it all the way around. I used hot glue.
Then I made two frivolous-looking bows (not real tied bows– just two loops of fabric gathered in the center), one for either side of the bonnet, and hot-glued and stitched them on. All done!

Notes:
- Not all straw hats will stretch and shape as easily as this one did– I’ve read that woven hats (like this one) are much easier to work with than hats that are made of braided straw that’s sewn in a spiral (like my previous bonnet). It makes sense– the sewn hats have thread all through them, which doesn’t stretch much, and braids are only going to stretch in one direction– lengthwise. Woven hats can stretch in both directions, and this particular hat had such an open weave that there was lots of room for it to do so.
- Even if your hat doesn’t stretch out lengthwise to make an extra-high crown, I think the cowboy hat shape is especially good for bonnets simply because it’s originally made with a higher crown than usual– necessary to mold in that dipped center shape and still have it fit the wearer’s head.
- Unlike my first bonnet, I didn’t feel the need to line this one– probably because the straw was more smoothly woven than the previous braided/sewn hat. Your mileage may vary, though.
- I ordered 4 yards of 1.5″ wide ribbon for the hat– I used exactly 2 yards for the long piece across the front that turned into the ribbon ties, and another 15 inches for the shorter piece across the back. Each bow took just over two feet of ribbon, so in the end I had about 18″ to spare. I didn’t think I’d need as much as I did, so I’m glad I over-ordered.

How fun! This turned out great. The open weave is really pretty.
LikeLike
It’s lovely!
LikeLike
Pingback: Bonnet for Dickens Fair | It's All Frosting...
Pingback: Fun “Bar” Suit, Part V: Hat and Olive Hatpin | It's All Frosting...
Pingback: 1880s Hat Conversion | It's All Frosting...