1880s Squirrel Dress, Part V: Bodice

So… you know how I said that I’d sourced all of my fabrics, and had picked out a dusty pink cotton I already had in my stash to use for part of the bodice of this dress? Well, I lied. Not so much lied as had second thoughts. And third thoughts. The pink was fine next to the striped fabric, but the velvet I wanted to use for the lapels was so deep and saturated that it just made the pink fabric look washed out and plain. The tough part was that I didn’t know what else to use– I didn’t want another patterned fabric that might clash with the stripes, but I hadn’t been able to find any other solid cottons that matched well. I couldn’t use taffeta or jacquard, because that wouldn’t work with the cotton main fabric– too fancy. I could always choose white, but that seemed like giving up.

Finally, I came across a line of fabrics called “peppered cottons” by Studio E Fabrics. They’re shot cottons– fabrics with the warp and weft threads in different colors so they change color at different angles– and they came in some lovely shades. I ended up picking “Fuchsia,” which has plum-colored threads in one direction and hot pink in the other.

Peppered Cotton FUCHSIA 40 by Pepper Cory for Studio E image 2

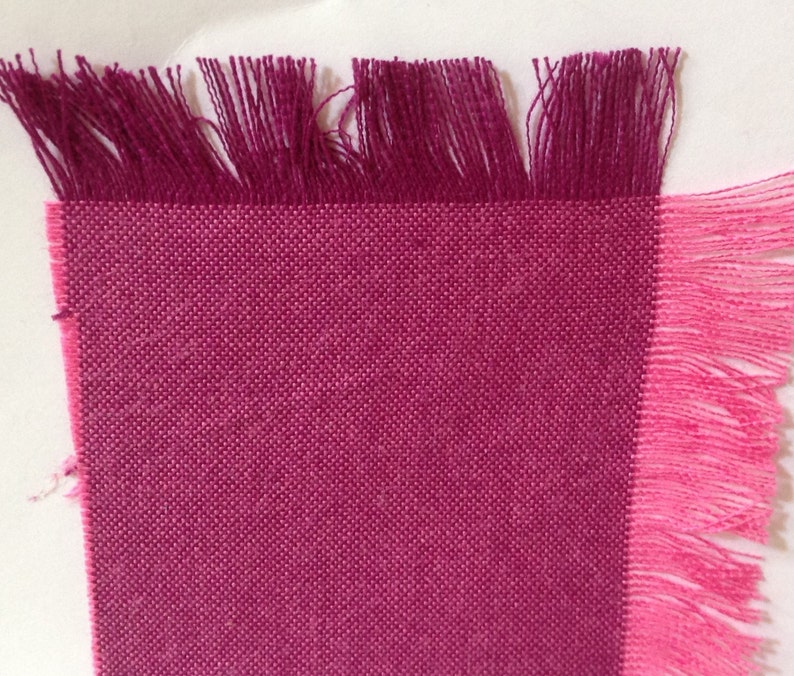
It works as a nice “bridge” between the cooler-toned squirrel stripe and the warmer-toned velvet. I also used it as the reverse side of the velvet collar and cuffs.

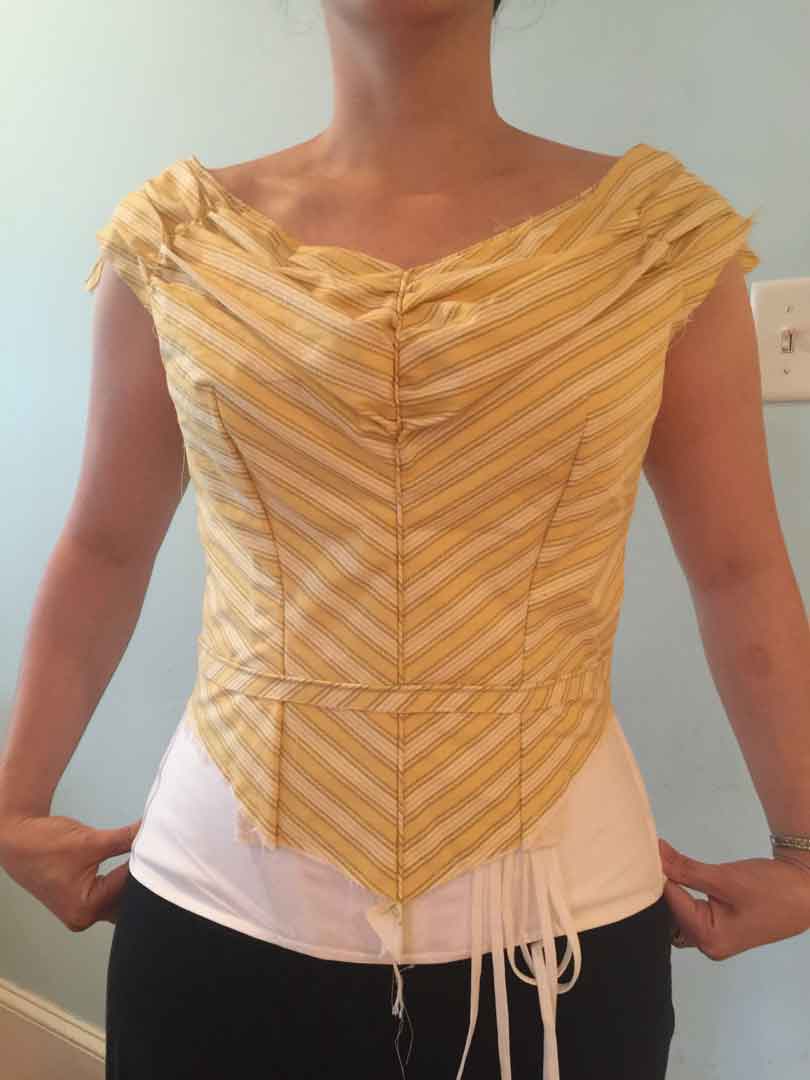
Anyway, once I had the fabric issue resolved, I was able to use my revised pattern to cut out the real bodice– I was able to use my new rotary cutter and cutting mat, which made the process so much faster! In order to get the stripes to be symmetrical I cut out my striped fabric one piece at a time, mirroring the somewhat see-through lining fabric to get the placement just right.

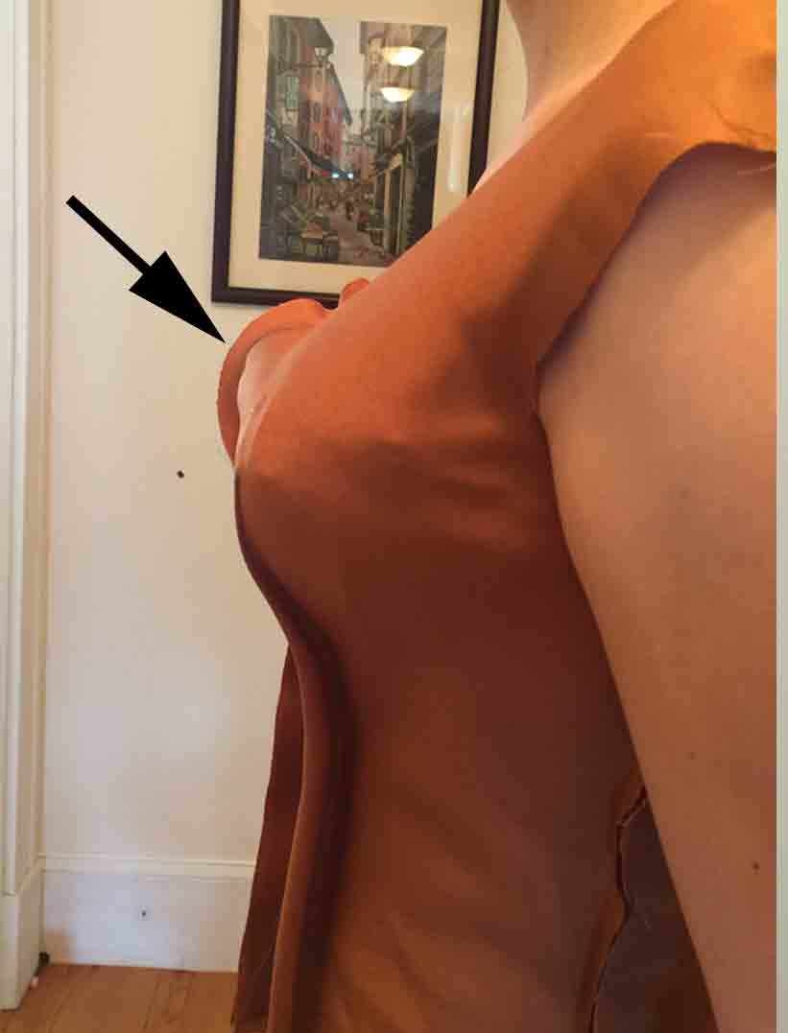
I will note that I made a tactical error in laying out my front bodice pieces– I should’ve taken note of the dart placement to ensure that the darker narrow stripes weren’t going to get swallowed up by the darts. If I’d had the darts take up the wider, lighter areas between the stripes, the design would’ve had a flattering taper at the waist– as it is, the stripes disappear into both darts, leaving a large stripeless area that doesn’t look quite as nice. Sadly, I didn’t realize this until I’d actually assembled the bodice, which made it far too late to fix.

Continue reading

1880s Squirrel Dress, Part IV: Bodice Mockup

With my skirts basically finished, it was time to start work on the bodice. I specifically planned to make it before pleating up my trim for the skirts, since trim can be pieced together and fudged a bit, whereas the bodice needed to be perfect (and stripe-matched). Anyway, I used Truly Victorian 466, the Alexandra Bodice, and I admit that at first glance it looked pretty daunting. So many pieces! Obviously, I started with a mockup.

My first try wasn’t awful, but it needed some work:

The sleeves were too far off the shoulder and I think the back of the bodice was just a touch too long, which made the whole back wrinkle oddly. I took some width out of the shoulders, and shortened the bodice at the shoulder seam because it was loose in the upper chest and back. Plus, once I had all of my skirts on the added bulk at the front required some extra room over the tummy, which I achieved by adding a little extra flare to the bottom of the side pieces. Oh, and the sleeves were far too loose for my arms, so I took out a whole inch of width all the way down the back seam, and shaved off some of the curve at the elbow because it pooched weirdly when my arms were straight. So basically I changed everything. 😉

Continue reading

1830s Butter Yellow Day Dress, Part II: Bodice

1830s-yellow-bodice

The first thing I do for any new pattern these days is make at least a partial mockup– and in this particular case I’m extra-glad that I did, because the bodice was just WEIRD on me as originally drafted. I must have extremely square shoulders or something, because when I pulled the neckline out to the correct width, the center front got pulled up to make a really prominent bulgy area right at the bust. 

1830s-mockup.jpg

At first I tried taking a fisheye dart right in the center to pinch out the extra fabric, but eventually I realized that it was a shoulder issue. Once I added a little extra space to the shoulder line (an extra size’s worth, front and back), that opened things up and smoothed out the center front. Whew! I suppose it might not have been a big deal anyway, given that the smoothly-fitted bodice lining is covered up by an over-layer, but I want the fit to be right even if I can’t see it. One more thing I did change was to add an extra 2″ to the side seams to allow for some expansion if required in the future.

Continue reading

1898 Black Moiré Convertible Gown, Part IV: Bodice Embellishment

moire-bodice-done

One I had all the structural elements done, it was time to decorate! To add interest to the bodice, I draped some more of my striped netting over the top of the bust and into the armscyes, tacking down pleats asymmetrically for texture. I pinned the netting in place while it was on the dress form, tried it on to ensure I liked it, and hand-stitched it all down, similar to the bodice on my wisteria gown.

moire-bodice-net

For the back I took a slightly different approach– I wanted to hide the closure rather than having the tulle get all bulky from overlapping at center back, so I only tacked down the pleated tulle on the left side of the neckline, leaving the remainder loose. I pleated the loose side down to a short length of black twill tape and added two hooks so I could fasten it at the right shoulder with thread loops.

moire-bodice-back

Continue reading

1898 Black Moire Convertible Gown, Part II: Evening Bodice Base

moire-bodice-base

To make the evening bodice for this outfit, I could’ve bought a whole new pattern but decided (after some conversation with Heather from Truly Victorian at Costume College last year) to modify my Truly Victorian 442 ballgown bodice, which is dated to 1860. I’d used it for my embroidered ballgown before and knew that it fit me well through the torso, so it was a good starting point.

I wanted to lengthen the bodice slightly at the sides to flare out just a bit over the hip, and also change the neckline to bring it up onto the shoulder, because I’d read that an on-shoulder neckline was correct for the period.

I had a whole post written out about how I adjusted the off-shoulder neckline to be on-shoulder instead, then cut out a squared-off neckline to complement the puffed sleeves I had planned– I even made the whole bodice and bound off the neckline, basted in the sleeves, and took pictures for this post!

And then I saw a fashion plate from 1899 with an off-shoulder neckline and instantly started picturing how my gown would look better with a wider shoulder to make my waist look smaller in comparison. I spent an afternoon trying to convince myself that my (already finished) bodice was just fine, but eventually I caved and decided to fix it. In other words, to undo almost all of my pattern modification and hard work. (sigh)

Continue reading

Lady Macbeth Beetlewing Gown, Part V: Bodice Construction

beetlewing-bodice-done.jpg

I decided that rather than trying to stitch the beetlewings onto the individual bodice sections before assembly, I’d put the bodice together first to ensure proper fit and placement of the beetlewings. I was actually really excited for this step, because my pieces were finally starting to look like an actual dress after months of collecting supplies, dyeing, patterning, etc.

As noted before, the bodice was cut with princess seams to add stability. I basted the pieces together by hand to make sure that everything went together smoothly (had a moment of panic when my first iteration seemed to be HUGE, then realized I hadn’t used wide enough seam allowances), then machine-stitched the seams. They were kind of bulky with all the layers in there, so I trimmed down the seam allowances before folding one of the gauze layers over and flat-felling each seam. It wasn’t the neatest process, but it helped clean up the inside and kept the somewhat scratchy tulle layer from irritating my skin.

I was originally going to add a waist stay to support the weight of the skirt, but decided instead that I would mount the skirt on an entirely separate waistband, which would then be tacked to the bodice like a waist stay, so I let that step go for now.

I installed a 22″ long invisible zipper down the center back (would’ve been better to have a 24″ zipper but I couldn’t find one), leaving a 2″ seam allowance on each side to allow for sizing adjustments later on if necessary. I was happy to see that it appeared to fit perfectly, likely helped along by the slight stretch in all of my fabrics. Now I just have to hope that the skirt won’t mess up the line of the bodice after I’ve attached it…

Continue reading

Regency Pashmina Dress, Part II: Bodice and Skirt

Let me just say at the outset that I am never going to make a dress out of pashmina shawls again. The fabric is so loosely woven that it’s next to impossible to cut straight, it frays if you look at it funny (I had to zig-zag every single edge to keep it from unraveling entirely), and it snags at the slightest provocation. Unpicking seams takes forever and leaves gaping wounds in the fabric, the weight of the skirt alone appears to be pulling the fabric itself out of shape, and I have no idea how I’ll wash this thing if it ever needs cleaning. Never again. Never. Again.

Anyway, back to a time when I didn’t know all this…

Continue reading

1860s Embroidered Ballgown, Part VI: Finishing the Bodice

ivory bodice fixed

So as you recall, I had some issues with the seams rippling in my bodice— I wasn’t sure what was causing it, but after some consultation with other costumers online we determined that it was likely due to the bodice being too long. The extra length was being pushed up and forwards by the curve of my skirt, causing the seams to buckle.

ivory-bodice

One way to remedy this issue is to fix the shape of the bottom of the bodice– since the original pattern hadn’t provided a stitching line or directions for how to shape it, I’d just done a basic pointed bodice, front and back. However, closer examination of the fashion plates and extant gowns showed that pointed bodices back then had an entirely different shape– much more curved, with a distinctly long front point when compared to the rest of the bodice. This allows the skirt more room to bell out without pushing out the bodice edges.

41fc91c68357184169d0d4baa662b3e5

I removed my piping and adjusted the shaping of my bodice hem to get it closer to that high arch on each side of center front– I couldn’t make it nearly as extreme as the example above, but I think it’s a little better– besides, not all period gowns had the extreme arch shape anyway.

Continue reading

1915 Picnic Dress, Part II: Bodice

I had originally planned on making this a two-piece dress with a separate blouse and skirt, but then realized that my fabric was so sheer that it would clearly show the tucked-in blouse through the skirt, making the whole thing look weird. I decided instead to turn it into a dress and add a closure to the side front. The layered design of the skirt would help with this, since it would disguise the closure once it went past the bodice.

I started with Truly Victorian’s TVE45, the 1911 Narrow Panel Blouse, cutting out a mockup just to see how it would fit. To my surprise, it did not go well.

TVE45 - 1911 Narrow Panel Blouse

The pattern is so basic– two T-shaped side panels connected by a front and back– that I’d assumed it would go together easily and without much trouble. Well, it went together easily, but the fit was all off. The front panel was far too low on the chest, and the kimono sleeves pulled the already slightly-angled neckline even more towards the sides of the shoulders, causing unsightly pulling across the bust and skewing the neck opening. The sleeves were also too baggy, which is probably a matter of preferences vs. a flaw in the pattern, but which still had to be adjusted.

I endeavored to fix things first by altering the shape of the front and back panels to be wider and less angled. I like the angled look in general, but here it was not only causing the above-mentioned fit issues, but also reducing the amount of visible space available for my lace bodice insert, which I’d intended to show off. Making the panels wider gave me more space, and making the sides straighter kept the neckline stable. I also raised both panels up several inches– the front for modesty’s sake and the back to keep the neckline where it belonged.

Continue reading

1860s Embroidered Ballgown, Part V: Bertha

So it’s time to make the bertha (weird name for an article of clothing, but whatever). Berthas can be made of flat or pleated/gathered pieces of fabric, trimmed in any number of different ways. TV442 comes with two options– a flat one and a gathered one.

tv442-01

I decided to make the gathered bertha, which was really just a long, hemmed rectangle with angled lines of gathering to form the ruffles. I figured that I’d cover up my gathering lines with some blue and gold trim to add some visual interest. Accordingly, I cut out the fabric, ran gathering stitches along the appropriate lines, and started pinning things to see how it would look.

Unfortunately, it ended up looking like this (ribbon is tacked down as a placeholder only, but you get the idea). Ugh.

bertha-ruffled

Continue reading