1880s Hat Conversion

Once I’d finished my 1880s Squirrel Dress, I had to have a hat to go with it. I have yet to venture into completely handmade millinery, so I’m always eager to find existing hats that can be adapted to more historical uses. My favorite may always be the Regency Cowboy Hat bonnet, but this one is a close second– I made it from a children’s trilby hat in bright pink.

I was going for something along the lines of the hat in the center here:

Or this one, from the Met Museum.

Both are probably slightly too early in the period to match my dress, but they’re just so pretty that I decided to go for it anyway.

Continue reading

Fun “Bar” Suit, Part IV: Purse

To go with the “Bar” suit, I needed some bar-themed accessories that were in keeping with the overall look (so no shot-glass necklaces or coaster epaulettes).

I started with the handbag, which began life as an acrylic purse shaped like a perfume bottle.

61ykp1azo7l._uy575_

It’s also shaped almost exactly like a bottle of Disaronno liqueur, so I decided to replace the “Paris” label with a faux Disaronno label to keep with the “bar” theme.

323.gallery

I took an image of the label and tweaked it to the proper dimensions (2.5″ wide x 2″ tall, in case you wanted to know), then printed it out onto ivory cardstock before filling in a few bits of color with a red pen.

Continue reading

1915 Picnic Hat With DIY Wired Ribbon

picnic-hat-done

So to go with my 1915 picnic dress, I needed a hat to shade my delicate complexion from the sun (or something like that). I tried using my flowered Edwardian hat but it seemed too elaborate for the relatively casual dress, so I went looking for something new.

Since it’s summer there are plenty of straw hats available, but most of them are pretty floppy and that wasn’t what I was going for. I thought I’d start with something more boater-shaped, but apparently I was cutting it a bit close time-wise because most of the cheap boater options online had a 2-3 week shipping time, which was too late for my upcoming picnic.

I ended up with a costume gondolier hat, which is coarser straw than I would’ve liked, but it looked about right. Many purchasers complained that the crown was too shallow and the head circumference was too big, making it sit oddly on the head, but one reviewer (a woman after my own heart) noted that it was perfect for puffy Victorian/Edwardian hairstyles, which I thought made it worth a try.

picnic-hat-new

Continue reading

Tweaking Funtasma’s Edwardian Pumps

One of the things about making an above-the-ankle Edwardian day dress is that you suddenly have to care about your shoes. My previous Victorian/early Edwardian gowns were mostly long enough to hide my feet almost entirely, so the shoes didn’t stand out as long as they were a neutral color and shape. But my Edwardian picnic dress is intended to show some ankle (scandalous!), so shoes matter.

Of course, I already knew where I’d love to get my shoes– American Duchess. I’ve been drooling over her stuff for ages. But as much as I adore her gorgeous footwear, particularly the Astorias, they’re not really in the budget right now given how infrequently I’d wear them. So I turned to the cheap knockoff version made by Funtasma– the style known as Dame 02.

Check out the American Duchess shoes (left) vs. the Funtasma shoes (right):


Continue reading

Regency Spencer (Cheating)

Skipping ahead a bit (I haven’t gotten around to uploading the photos of the dress by itself), here’s my attempt at period outerwear!

When I realized that due to my Regency event being in April it was likely to be pretty chilly outside, I decided to make a spencer (short jacket) to wear over my day dress. Of course, if there’s one thing I detest in sewing it’s making collars, and I didn’t have the energy to get a pattern and sew a whole jacket from scratch– so instead I went searching for a modern jacket I could convert into a spencer. I was looking for puffed sleeves, a small collar (regular jacket lapels are too big), and some shaping seams to keep it from looking too bulky.

I did a lot of searching online for “military” and “Victorian” jackets (they were the best keywords for the style I was looking for) and ended up finding a khaki-colored canvas jacket that appeared to meet most of my requirements on eBay. It was a size XL in juniors’ sizes, which meant that it ought to fit all right, and it had some nice pleating and piping details that I thought would look good on the finished spencer.

regency-spencer-before

Continue reading

Improving Storebought Caramel Topping

caramel-doctor-originalEvery year we throw an ice cream party, where guests bring their favorite flavors of ice cream along with toppings to create an ice cream buffet. Unfortunately, once the wreckage is cleared away we find ourselves with an excess of high-calorie, high-sugar treats in the form of sauces, crumbled cookies, and candy– what to do with them?

I managed to use up a lot of the leftovers, but one bottle of storebought “caramel flavored syrup” remained stubbornly in our refrigerator. I usually make my own caramel sauce (deeply caramelized, and hit with a generous pinch of salt), but I thought I’d try my hand at doctoring up the storebought stuff, just to see what would happen.

Continue reading

Upcycled Birthday Princess Dress, Part IX: Done!

IMG_5432.jpg

Done! Finally done! And it turned out so gorgeous! I’m so excited about this dress– despite the changes of plan and occasional difficulties, I really love it. I just hope my daughter will wear it…

When we left off, I had just finished the paned sleeves, which are just one of the many fabulous features I can’t stop squee-ing over. To finish up I stitched the rose clusters to the skirt bustling points, then made a few more rosebuds of various sizes to finish off the neckline along with some silver leaves. It took several tries to get an arrangement I liked for the neckline, but eventually I settled on one and stitched it down.

birthday-princess-neck.jpg

And voila! Finished!

IMG_4655

For the previous work-in-progress posts, see below:

Part I: Sketches

Part II: Fabric

Part III: Revising the Design

Part IV: White Underskirt

Part V: Bustled Overskirt

Part VI: Basic Bodice

Part VII: Chiffon Roses

Part VIII: Paned Sleeves


Final Thoughts:

  1. For the love of god, don’t buy a dress to upcycle unless it is larger than you need it to be. I thought the size 5 kid’s dress would be big enough for my daughter, and the fact that it wasn’t caused all kinds of extra trouble that could’ve been avoided. If I’d known ahead of time how much work upcycling would be, I would have made the dress from scratch. Remember, making things smaller is a heck of a lot easier than making them bigger.
  2. EBay formalwear is still a great place to find yards and yards of fancy fabric, and I’d recommend it to anyone, especially if you’re looking for satin. Bonus points for embroidery details and petticoat layers underneath!
  3. Unless you’re really good at pattern drafting it’s best to have a printed pattern to work from for the basic things like sleeves and necklines. You don’t have to take it as gospel, but you can use it to compare to your own pieces and make sure they’re somewhat in the right range.
  4. Making a duct tape dress form made this process infinitely easier. Highly recommended.
  5. However, you still need to try the dress on your child to make sure there aren’t any surprises. Case in point– when I tried the skirt on my daughter for the first time, it was clear that the weight would drag it down from her natural waistline over time. The solution was to buy suspenders to keep the skirt at the right height– they fit just fine under the separate top and the skirt stayed firmly in place the whole time.

Upcycled Birthday Princess Dress, Part VI: Basic Bodice

When making the bodice it took me a while to decide how best to display the embroidery on the fabric. After much vacillating and even more pinning, I decided to use the existing bottom hem of the bodice, which would forfeit the pretty design along the top edge but which would let me have a more structured bottom edge. I took a deep breath and started disassembling the bodice.

birthday-dress-bodice-pieces

Once I’d figured out what I was going to do, I had to prepare the bodice for cutting– that meant slitting open the side seams and removing the boning from the front, and then re-shaping the bodice entirely to change it from being curved over the bust to being flat (as 4-year-olds are not known for their curved bustlines).

birthday-dress-boning

Continue reading

Rhinestone-Embellished Holiday Dress

rhinestone-dress

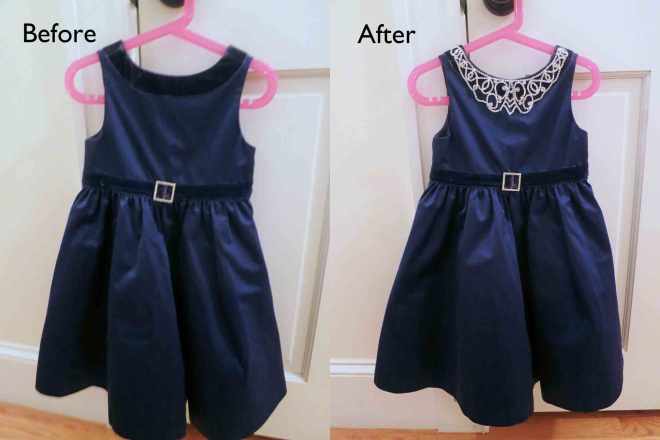
Every year for the holidays I have fun looking through the stores for an adorable holiday dress for my daughter. In years past she’s been pretty compliant in terms of wearing what I pick out, since she loves twirly skirts, lace, sparkles, and all the components that are usually present in holiday-wear. This year I happened upon a lovely (but plain) dress, and decided to do a little quick DIY and fancy it up to meet her high standards.

Continue reading

Ninja Crib Mobile

ninja-mobile-done

I started off titling this post just “Ninja Mobile,” but that kept making me picture a ninjamobile– a car filled with ninjas who would drive around and pick fights with bystanders– so I felt the need to clarify.

This crib mobile is a gift for a friend’s baby shower, and is actually the second mobile I’ve made– the first featured corgis and sheep, and I was inspired to make it after paying far too much for an Etsy seller to make a mobile for my own daughter’s nursery. Making your own mobile is easy, though of course you can always complicate matters (at least I can) by planning fancy details.

Basically, the mobile is made of a wooden embroidery hoop, from which you hang various felt ornaments– in this case, ninjas. Then you cover the hoop in felt and hang it from the ceiling. Simple, right?

Continue reading