

I admit it, I’ve been bitten by the Regency costuming bug. It’s just such an easy period to sew for, and there actually seem to be enough places to wear the results, that I can’t help myself. For my excuse to make this one I told myself that I was planning a costumed picnic for this summer, and that I would need something new either to wear myself or lend to someone else for the event. Makes sense, right?
Anyway, I considered breaking up this post into several installments, as I have with other dressmaking projects, but honestly the dress went together in a single weekend– it was that easy– so it hardly seemed fair to make you all wait for longer than that to see how it turned out! I’ll just put in headings for organization…
Fabric
Part of this project is driven by fabric– I found a lovely vintage cotton sari on eBay that I was dying to use, especially once I diagrammed out how I could make best use of the border print. Sari fabric is actually a very period fabric for Regency dresses, as the British colonies in India were regularly supplying it for use in England.
The sari itself is extremely thin and delicate– it looks like a cotton gauze, and it’s so light and airy that it’s basically transparent. I hand-washed it so it wouldn’t get messed up in our washing machine, and let it air-dry in the sun before ironing it to get it ready for use.

It has a wide border down one side and a narrow border down the other, with a double-wide border on one end (the “pallu”).
Pattern
Since there’s a possibility I’ll be lending this one out I decided to modify my original pattern (Simplicity 4055) ** to make the dress somewhat adjustable in size– to do this I added a drawstring at the neckline to allow for adjusting the fullness of the bust, and a drawstring in the back of the waist to allow for changing its circumference. I figure that while I want to keep the flat-fronted skirt for looks (to avoid the inadvertent pregnancy silhouette), allowing extra space in the back will just mean more or fewer gathers in the back of the skirt, depending on the person wearing the dress. This method is actually period-appropriate, which I didn’t discover until after I’d worked out how I’d do it. So much for my “original” idea!
Skirt
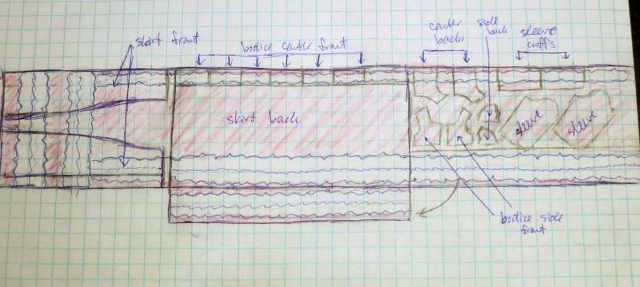
Since the sari was only about 40″ wide it wasn’t possible to use the width of the sari as the length of my skirt (needed 47″ for that to allow for a hem), besides which I had some ideas for how best to utilize the design of the fabric. I wanted to use the wide border for the bottom of the skirt but didn’t want the narrow border at the waist– I determined that if I cut off the narrow border (about 4″ wide) and attached a second wide border (about 11″) underneath the first one, I would have just enough fabric to make a decent-length skirt. That worked for the back panel.
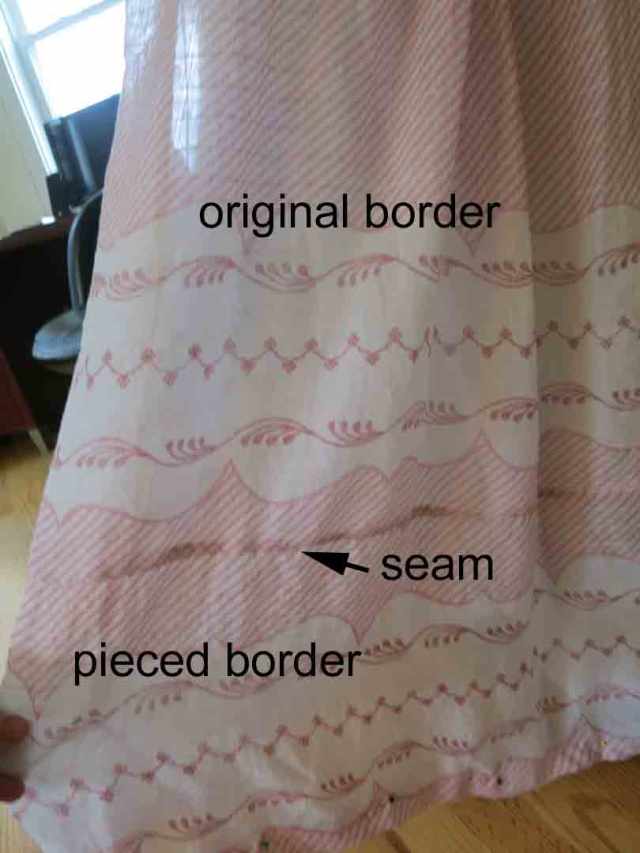
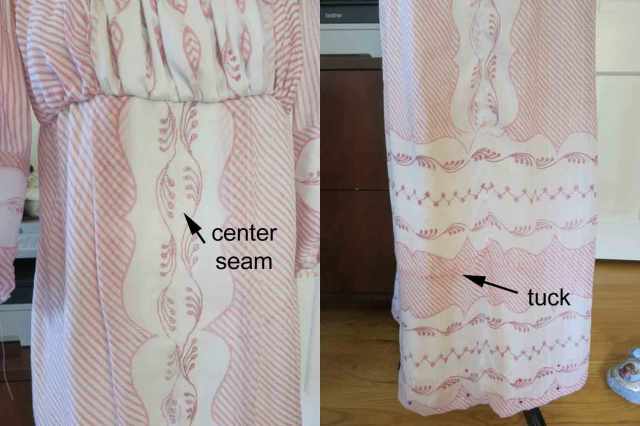
For the front panel I used the pallu end of the sari, which already had a double wide border, and which just needed a tuck between them to narrow the gap to match the back panel’s spacing. Then I decided to make a design down the center of the skirt, which I did by cutting the front panel in two pieces and joining the side borders in the middle.
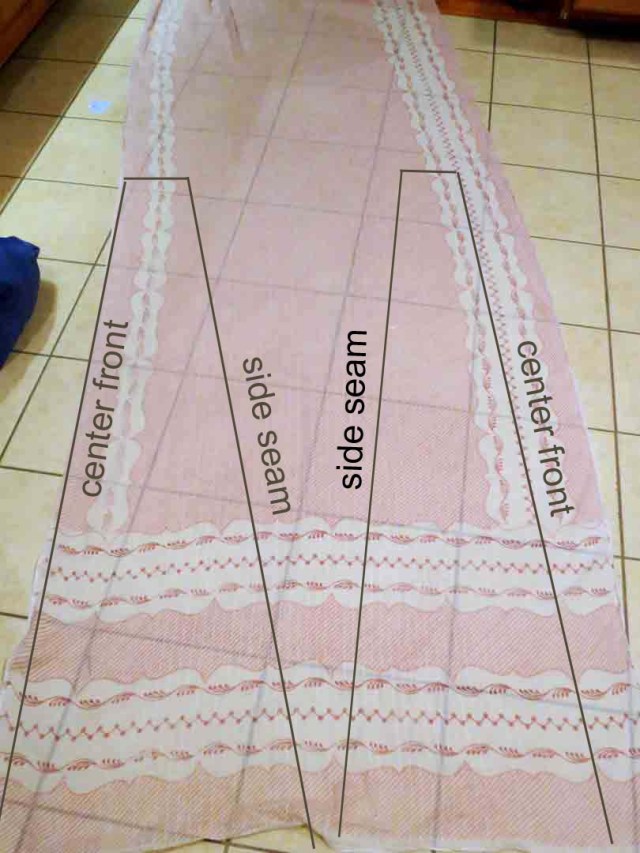
Once I’d cut my front skirt panel I measured how much length I had left in the sari– 160 inches, which meant that my back skirt panel could be no more than half that measurement– otherwise I wouldn’t have enough wide border to make the double-border along the bottom. Accordingly, I cut a 75″ panel from the sari to use as the skirt back, and cut the wide border off of the rest of the sari to attach to the bottom of it. That left me with a 75 x 29″ piece of fabric to use for the bodice and sleeves, plus an additional 75″ of narrow border I’d cut off from the skirt back to begin with.
Bodice
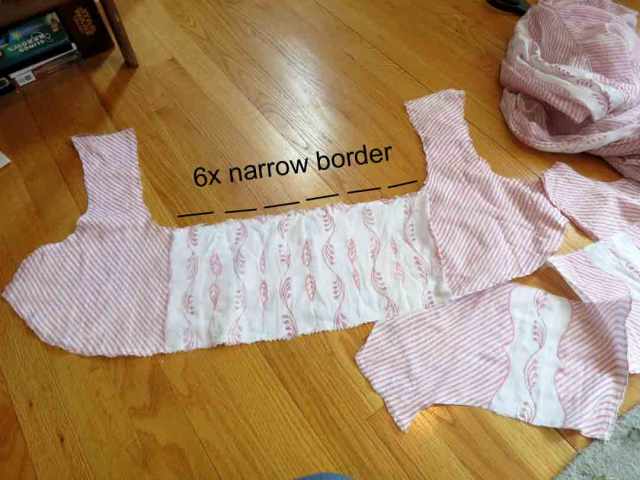
To create the drawstring bodice the front was easy– I just moved the pattern piece several inches away from the center fold so the horizontal section of the neckline was 2.5 times as wide as the original. This would allow for plenty of gathering room, even for larger-busted ladies, and made for an attractively gathered look (it needs to look intentional, not just wrinkled). I wanted to use the border pattern for the center of the bodice, so I stitched together six pieces of narrow border and laid them out flat to cut the center portion of the finished pattern piece from. Then I patched together the side sections from the remaining plain fabric.
I will note that once I started cutting out the sari pieces it became clear that the fabric was too delicate to use on its own for anything but the skirt, so I decided to flat-line each of my bodice pieces with white cotton voile. It’s also light and thin, but provided just enough strength to my sari fabric that I wasn’t worried about it ripping anymore.
For the back I took my own advice and straightened out the curved back seams so they were easier to put together. Then I expanded the center back pieces from the center until the finished back bodice was as wide as the original size 20 back bodice, figuring that it would provide enough wiggle room for most of my acquaintances. I cut the back pieces to use the narrow border in the center to mimic the front design (luckily the fabric had no “right side” so I didn’t have to worry about mirroring the pattern pieces).

Once I’d lined the bodice in regular white cotton (harvested from a Goodwill sheet), I stitched a narrow channel around the neckline, and used 1/4″ white satin ribbon as the neckline drawstrings. To keep the squared-off shape of the front neckline I tacked the drawstrings down at the front corners, and then tacked them down again at the shoulders. This meant that the front of the neckline gathered only across the front (not up the sides) of the bust, whereas the back neckline gathered along the entire back.

To keep the front drawstrings hidden I hand-sewed small eyelets on the lining side of the casings (though the seam allowances for strength), which ensured that the drawstring ends would stay on the inside of the bodice rather than showing on the outside.
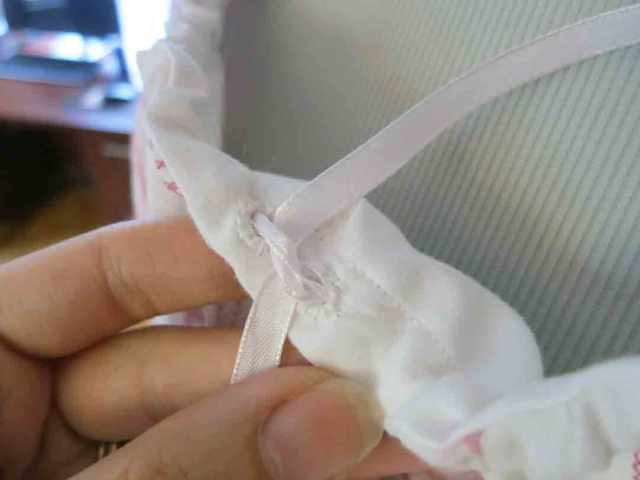
For the back I could’ve done the same thing, but decided instead to experiment with an overlapping drawstring closure– that meant that the eyelet was on the lining side on one half of the bodice, and on the outside for the other half. It worked perfectly, and now the drawstrings aren’t immediately visible.

Sleeves
I also drafted elbow sleeves for the dress, deciding against short puffed sleeves as looking too juvenile in this fabric, and against long sleeves as looking too matronly. I cut them on the bias to allow for a little stretch and freedom of movement (though I think I might have cut them just a touch too small… oops), and attached more of the narrow sari border at the elbows for trim. They were flat-lined in voile but were not lined with the heavier cotton. I hand-stitched the hems.

Assembly
Attaching the skirt front to the bodice was relatively simple– I gathered the front bodice to fit the flat front of the skirt, and sewed everything in place. I had to take two pleats in the skirt front due to a mis-measurement of the sari fabric, but that was easy. Having 75″ of skirt fabric to cover about 18″ worth of back bodice, I did some serious pleating in the center back of the skirt, which resulted in some nice fullness and movement.
Finally, before I stitched down the bodice lining to cover the waist seam I hand-sewed more eyelets, again with one on the outside and one on the inside. It was so much easier to sew them before the drawstring channels were sewn. Then I stitched two waist channels– one on each side of the back from side seam to center, and then I just used a single ribbon, letting it run freely behind the bodice lining for the front section. This kept the channel stitching from interfering in my pretty gathered-front bodice, and if I ever need to replace the drawstring it’ll be easier to do so than with the tacked-down neckline string.
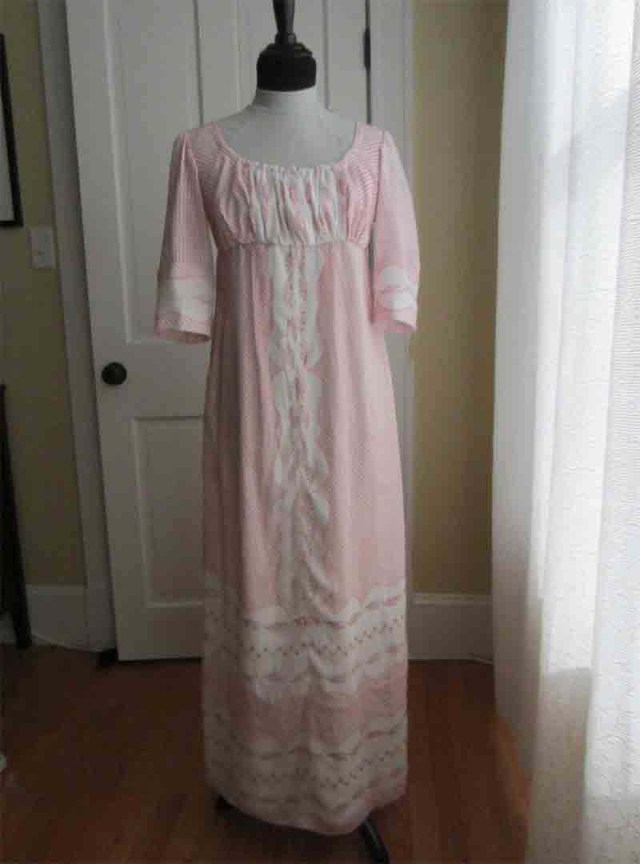
The finished dress!

Notes:
- This sari was so light and gauzy that it was really difficult to cut– it kept shifting and refusing to lie straight on the grain. One technique I used to keep the fabric in place while cutting out the bodice was to cut out the cotton voile flat-lining pieces first– those were easy. Then I laid the voile pieces onto the sari, using the friction of the two fabrics together to keep the sari fabric in place while cutting the new pieces. It was much better than trying to keep the fabric from slipping around under a paper pattern piece, and because the sari was so sheer I could lay the voile underneath it and really make sure that the sari was lying flat and straight on top. Then I machine-sewed 1/8″ from all edges to keep the pieces together, after which I could just treat the two layers as one piece of fabric.
- I french-seamed both layers of the skirt to avoid fraying and to keep the seams as neat-looking as possible, since the skirt fabric was so sheer. I also french-seamed the straight seams of the sleeves, but didn’t bother on the bodice seams, since they were all covered by the lining anyway.
- I cut the lining (the cotton sheet lining, not the voile flat-lining) of the bodice front to be about 2″ narrower than the outer fabric, and I gathered the outer layer to fit the inner layer before sewing them together. This way the combination of sewn-down gathers and drawstring gathers looked nice, but there was less bulk in the drawstring channel because there was less fabric overall. The smaller inner lining still provided plenty of room for size adjustment.
- By the way, these yarn needles are the best tool ever for pulling drawstrings through casings. So much better than the safety pins I used to use!

5. Speaking of needles, I used an extra-sharp size 60 sewing machine needle for this project, figuring that it would work better on the fine gauze. I would definitely recommend doing this if you’re going to work with cotton saris.
6. Working with a border fabric makes measuring extra important– you can’t just hem the fabric if you cut it too long. I learned this the hard way, which is why there are several tucks in various places on the dress. Oh well…
** It has recently come to my attention that the creator of this pattern is also the author of a “Ladies Against Feminism” website, which espouses many ideas that I simply cannot support. Without going into detail, I will simply say that I will no longer be purchasing any patterns from sensibility.com, nor can I in good conscience recommend that others purchase the Simplicity 4055 pattern unless it is purchased secondhand.

Pingback: Regency Bonnet… from a cowboy hat | It's All Frosting...
Pingback: Regency Sheer Ballgown, Part II: Pattern and Bodice Construction | It's All Frosting...
Pingback: Regency Brocade Gown, Part I: Fabric and Design | It's All Frosting...
Pingback: Regency Brocade Gown, Part II: Skirts | It's All Frosting...
Pingback: Regency Brocade Gown, Part IV: Final Construction | It's All Frosting...
Pingback: Regency Pashmina Dress, Part I: Design and Fabric | It's All Frosting...
Really beautiful and I love the use of the sari – I’ve always wanted to use one. Interesting on the Ladies Against Feminism … I had no idea. Thanks for letting me know.
LikeLike
Pingback: Mary Bennet Regency Dress, Part I: Inspiration, Design, and Fabric | It's All Frosting...
Wow! Impressive. All that figuring and forethought had my head spinning, but the results are absolutely lovely. And so many helpful tips. Thank you!
LikeLiked by 1 person
Your dress is fabulous. Your instructions clear and helpful. But what I really appreciated was your integrity! No more Simplicity or sensibility patterns for moi. Brava, for doing the dirty work, sister!
LikeLiked by 1 person
Your loss. More patterns for me!
LikeLike
Pingback: Girls Block-Printed Regency Dress | It's All Frosting...
Thank you for doing the checking. I am not supporting anybody who does not support other women. Fair pay, credit, property ownership, and equal rights under the law are things I hold dear. ❤
LikeLiked by 1 person