1860s Embroidered Ballgown, Part III: Skirt

ivory-skirt.jpg

Once I had my underpinnings set I decided to make the skirt, so I could be sure that when my bodice was constructed it would fit over all of the skirt layers and still be able to close at the waist. I found a nice tutorial online for making a basic pleated skirt from a rectangular length of fabric, so I took a few pointers from that, but mostly I just winged it.

Continue reading

1860s Embroidered Ballgown, Part II: Hoop Skirt

hoop-skirt-done.jpg

I started by cheating.

Yes, cheating. I knew that I couldn’t get started on my dress until I had the correct underpinnings, and I didn’t have the energy to make myself a hoop skirt from scratch, so I bought the biggest one I could find on eBay– a 6-hoop skirt that was at least made from cotton, so it wasn’t quite as bad as shiny polyester. Don’t I get credit for that much?

Anyway, I knew from experience that the hoops on these cheap skirts are adjustable in size, so once it arrived I tried it on and took a look to see what needed to be done. Continue reading

Purple Regency Sari Gown

21433207_1599968050024912_4551797815193474870_n

I know, I know, I’ve already made several Regency gowns out of saris, but they’re just so perfect for this kind of thing! Besides, this one isn’t for me, it’s for a friend of mine who is (luckily) short enough to use the width of the sari as her skirt length, so I used a slightly different cutting layout than I have in the past.

purple-regency-layout

Continue reading

Red Bustle Ballgown

IMG_8511

I’ve already mentioned my propensity towards urging my friends to attend historical costume events with me, so it should be no surprise that for an upcoming Victorian ball I managed to convince a friend to let me outfit her in something appropriate– in this case, an altered modern ballgown (of course).

Continue reading

1910 Afternoon Dress, Part VI: Bodice

bodice

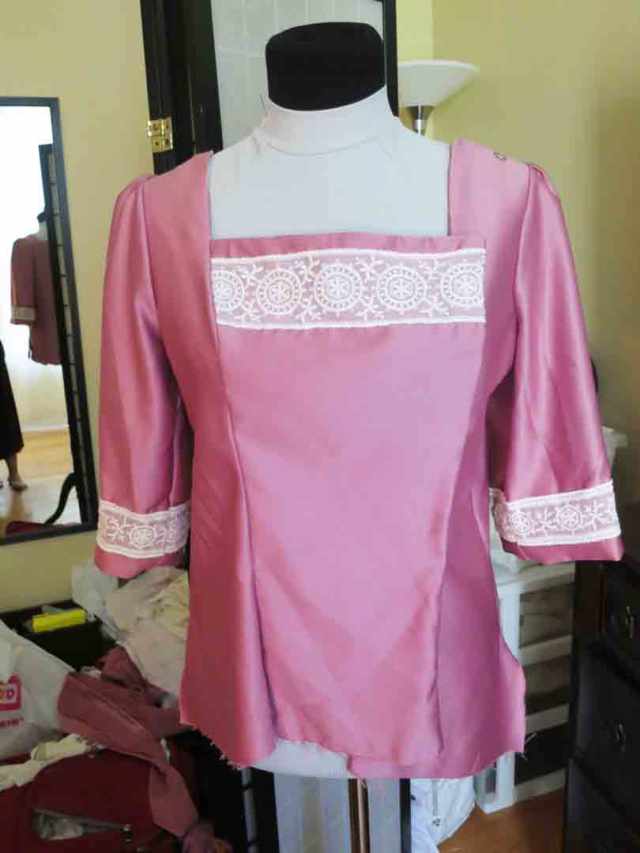
So after all of my mockups, you’d think I’d be pretty confident in my finished bodice pattern, right? Not so much. I was still a bit worried about finally cutting out the bodice, but eventually I convinced myself that any errors would be hidden by the sash and bretelles (and if not I had extra satin yardage to re-cut), so I just gritted my teeth and did it.

First I cut my pattern pieces out of the pink voile, and then laid those voile pieces onto my satin to cut it out exactly the same– much easier than cutting from a paper pattern, since the voile didn’t slide around on the satin. Then I flatlined all of my pieces.

I decided to apply the trim on the center front piece first– I had been going to use the full width of my widest trim across the bustline, but decided to cut off the outer borders to keep it from being too overwhelming. I pinned and hand-sewed the new, narrower trim to the front of my center bodice piece– it’s different enough from the sleeve trim to be distinct, but still matching. I was going to stitch more trim on the sleeve pieces at this point, but had such a hard time deciding where to place it that I decided to wait until I could try on the basic bodice and mark the correct height for sleeve trim.

bodice-trim

Anyway, I stitched the bodice together, and then tried it on. Yeah, not so good– not only was the bodice trim not quite properly centered, but I realized that the flatlining was making the bodice look too stiff. I ended up removing the lining from all the pieces except for the center front panel– I figured I’d want the extra body to help it lie smoothly over the torso (though I probably could’ve removed it if I’d wanted to). Talk about a waste of time for the original flatlining…

I drafted a 3″ wide facing to go around the front edges, which I cut from fusible interfacing and then ironed on to plain fabric. I had some issues with getting the correct shape, and the spot where the neckline and shoulders meet is kind of wonky, but it went mostly as planned. I understitched the facing to the seam allowances to get the neckline edge to roll ever-so-slightly inwards, which I think made for a really nice finish (particularly given that my satin didn’t crease well under the iron).

I decided to use snaps rather than hooks and eyes to keep the bodice closed– they won’t be under much stress since it’s not a tight-fitting bodice, so no real danger of coming unsnapped.

bodice-fastening

I stitched my sleeves together using a medium-length stitch, then set them into the bodice so I could try it on and figure out where to place my next pieces of trim. Once I’d figured out the correct height, I unpicked the stitches to about halfway up the sleeve, stitched on my trim, and then re-closed the seam over the raw edges before hemming it. I was able to hand-stitch the hem to the area of satin right behind the trim, so the hem didn’t show.

bodice-sleeve

I will note that this whole post leaves out or glosses over the numerous unforced errors I made in construction of this piece– I mis-cut the facing, so had to piece in extra scraps in two different places to make it fit the neckline; I cut the back neckline square without realizing what it would do to the shape of the shoulder strap (hint: makes it all wonky and weird-looking) and I can’t fix it without replacing the entire back piece, which I may do anyway; I was over-cautious when adapting the shape of the center panel, making it too flat at the bust seam, so I had to let it out a bit and then take it back in an even tinier bit because I’d miscalculated again… so many issues that had to get fixed, so in the end I felt like I’d basically wasted days’ worth of work. So frustrating. I guess it’s all part of the learning experience, right?

I think part of the problem is that I keep wanting the bodice to be good enough to wear without the shoulder bretelles to cover up my mistakes, but I’m forgetting that I designed the bodice with the express intent of covering up the design issues with the bretelles. So I’m trying to overcome issues that are part and parcel of the original design concept– not an easy thing to do. Nothing to do but soldier on, though…

Regency Rosebud Ballgown (Revamp)

regency-rosebud

So remember last year when I was sewing my blue Regency dress, and I said that I already had a Regency ballgown that I’d intended to use for that dance event? Here’s the story: Back when I was in college, I was shopping at JC Penney’s when I came across these beautiful shower curtains that I immediately knew would make a perfect Regency gown. That’s right. Shower curtains = Regency gown. Sounds weird, but hear me out– they were made of ivory netting, embroidered all over with variegated pink roses and green vines, and they were so pretty and antique-y that I knew they’d work.

Of course, back then I didn’t have much experience sewing dresses from scratch, much less dealing with fiddly materials like embroidered net, so I found a seamstress online (Etsy was not a thing back then) and commissioned her to make me a gown based on a sketch I sent along with my fabrics. It turned out nicely, and I spent the next several weeks snipping out embroidered roses from the remaining fabric scraps and applique-ing them onto the gown with hand-embroidered vines to make it more embellished. The finished product was really beautiful. It always reminded me of Anne Shirley’s dress from Anne of the Island:

She had a particularly pretty gown on. Originally it had been only a simple little slip of cream silk with a chiffon overdress. But Phil had insisted on taking it home with her in the Christmas holidays and embroidering tiny rosebuds all over the chiffon. Phil’s fingers were deft, and the result was a dress which was the envy of every Redmond girl. Even Allie Boone, whose frocks came from Paris, was wont to look with longing eyes on that rosebud concoction as Anne trailed up the main staircase at Redmond in it.

Continue reading

Regency Brocade Gown: the Ensemble!

Just wanted to give you guys a look at the new outfit in all its glory! I took these photos at the Commonwealth Vintage Dancers’ Regency Dance Weekend, which culminates in a Grand Ball. The hall provided such a nice backdrop for the rich fabric of the dress– I’m very happy with it!

Tanya 4

And then I stumbled upon a fabulous sofa that was crying out to be posed upon…

Tanya 6

This is totally my new favorite picture of myself in Regency-wear!

Regency Brocade Gown, Part IV: Final Construction

regency-brocade-done

To attach the skirts to the bodice (the last major construction step) I worked with each skirt separately– the underskirt was narrower than the overskirt, and I wanted to pleat them separately so they’d flow more gracefully when I moved. I only achieved limited success with that due to the stiffness of the hem trims (as noted earlier), but I did the best I could.

I pinned and basted each skirt to the bodice before machine-stitching the final waist seam (praying I wouldn’t screw anything up), and whipstitched the bodice lining over the seam allowance so the inside would be neat.

Continue reading

Regency Brocade Gown, Part III: Bodice and Sleeves

For the bodice front, I’d originally intended to cut the front pieces with the sari borders along the top edges so the trim would be integrated into the bodice from the beginning, the way I did with my dupatta open robe. However,  the angles of the neckline for the dress made it impossible to cut the sides as single pieces, so I decided to just add trim to a normal bodice front instead.

embassy-bodice

Anyway, I lined the bodice with more blue cotton, and (sneaky shortcut) lined the back bodice pieces with single-cut pieces of cotton rather than dealing with back seams on the inside. No one would ever see them anyway, right?

Once the basic bodice was put together, I attached trim around the neckline, hand-stitching it with invisible thread. I did this before putting in the sleeves because the trim was wider than the shoulder straps of the bodice, and I wanted to catch the edges in the sleeve seams to keep things looking neat.

Continue reading

My Fair Lady Ballgown, Part XIII: Paillettes and Rhinestones

So, time for the finishing touches! You can see in the photo below that in the center panel there’s an arc of large silver sequins just above the floral appliqué around knee level.

e9cbc320f4ad2a4579ab01b7269fc937

I bought 10mm silver paillettes to attach to the dress– I only needed 20 paillettes for that section, but then I realized for the first time that the dress actually had more paillettes around the hem! Good thing they came in a package of 200…

So, not only are there swags of embroidered trim near the hem, but there also appears to be a row of silver paillettes following the lines of that trim with short line segments connecting the two. It’s really only obvious in this one photo, so it’s no wonder I missed it on my initial viewing:

embasssy-floral-a

See the little gray dots following the lines of white trim? Clearly paillettes. However, I can’t tell what the faint white lines are– it’s possible that, like the sleeve and neckline detail, they are embroidered lines of thread with clear sequin “leaves” on either side.

e439ed3a09e5f06f19bfe9ee43521b9d

Continue reading