
To attach the skirts to the bodice (the last major construction step) I worked with each skirt separately– the underskirt was narrower than the overskirt, and I wanted to pleat them separately so they’d flow more gracefully when I moved. I only achieved limited success with that due to the stiffness of the hem trims (as noted earlier), but I did the best I could.
I pinned and basted each skirt to the bodice before machine-stitching the final waist seam (praying I wouldn’t screw anything up), and whipstitched the bodice lining over the seam allowance so the inside would be neat.
Finally, I made four buttonholes for small brass buttons (not historically accurate, but I have a lot of them on hand and they matched reasonably well) for the back closure.

And then I was done, right?

Not so much. (and no, the problem isn’t that the back neckline trim is uneven, I fixed that after I took the photo because I couldn’t un-see it)
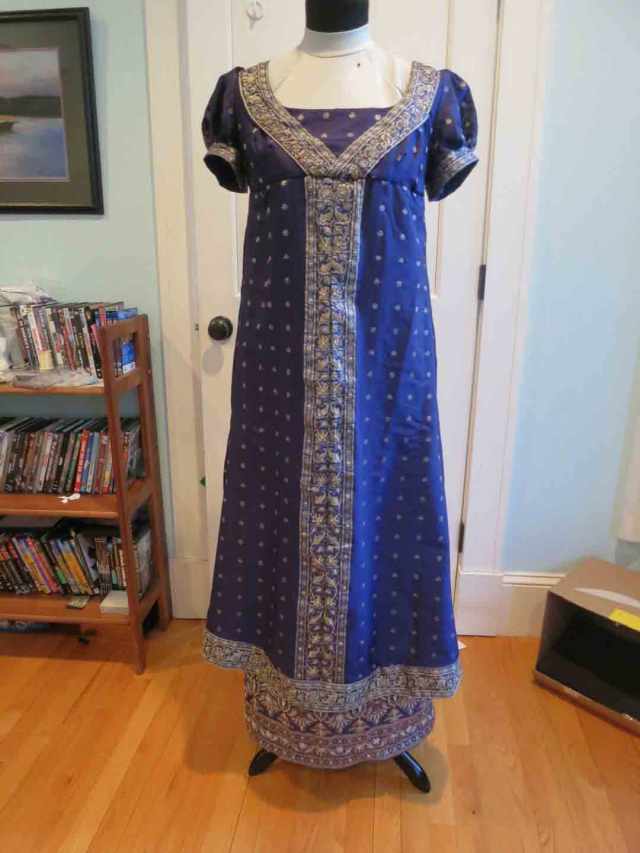
Looking at the dress, the scale of the front bodice trim started to bug me. It was just too wide and reminded me of a bib, which was not what I had in mind. I really wanted to make it narrower somehow. Ideally I’d have been able to fold under the “top” edge of the trim (closest to the edge of the neckline) and move the whole thing up, but that would’ve required unpicking all of the trim stitching, as well as part of the waist and most of the sleeves, and the back trim, then shifting the trim upwards and re-doing it all. In contrast, folding up the bottom edge only required me to unpick a few short sections of the waist and sleeves before folding the edge under and re-stitching. I think it looks much better this way. I didn’t change anything on the back, since the buttonholes were already done over the full-width trim. I will note that while the “upper” edge of the trim is stitched to the fabric all the way around, the “lower” edge of the trim is only stitched in the shoulder sections and hangs free across the bust. This helps it to stay flat, since the bust is curved and would make the trim buckle unattractively if stitched down.

So, what have I learned from this dress?
- Soft, drapey fabric is much more forgiving than stiffer silk, especially if that silk also includes stiff embroidered borders. Case in point: my cotton Regency sari dress used the same technique of matching borders and a trapezoidal front panel, but I didn’t have any of the skirt issues I experienced here, likely because the cotton fabric draped softly enough that the problems evened themselves out.
- Elaborate bodice trims don’t really lend themselves well to the soft underbust gathers that you find in Simplicity 4055. Try darts instead, you’ll thank me later.
- Be careful with your sleeve trims if you want them to be symmetrical– even if your sleeve piece is symmetrical, your armscye may not be. My sleeve trims ended up set slightly towards the back because the armscye was slightly larger in back than in front.
- If there’s any possible chance you might need to unpick your stitches, you may want to go with a slightly longer stitch length on your machine– it makes a huge difference if you need to undo a seam without either going blind or damaging your fabric, and the longer length won’t make a huge difference in wearability.
- And finally, if your fabric has a geometric or straight-line pattern, be extra, EXTRA careful with stuff like seam and trim placement. What’s not obvious on a solid-color or busy print will become glaringly obvious when it messes up the symmetry in a geometric pattern. (I’m looking at you, back neckline trim!)
Next up, headwear!
