
Once I had my paper pattern, it was time to get started on construction! It was quite an adventure, but I think I learned a lot– my next hat will be much easier! (I’m counting on it, since I promised to make my daughter a witch hat as well)
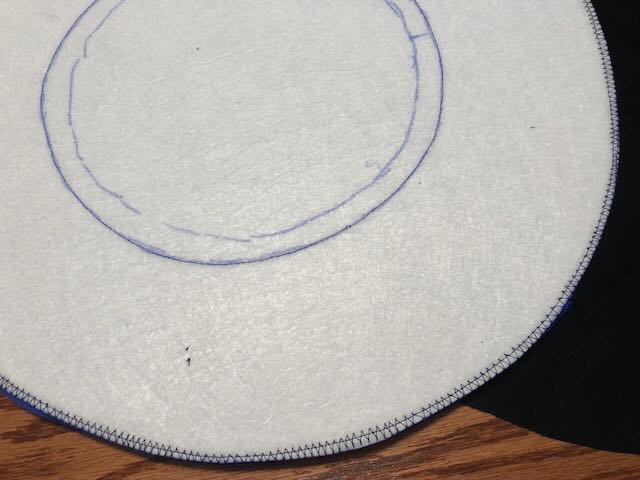
I started with the brim, cutting out a layer of my thicker Pelton Ultra-Firm interfacing in a circle to match my pattern. I also traced out my oval head-line and a line about 3/4″ inside that for tabs. After flapping the circle around for a bit, I decided that it was too flimsy, so I cut out a matching circle of the thinner Peton Ultra-Firm and stuck them together with spray adhesive.
I unspooled some of my 16-gauge wire and set it along the outer edge of my two-layer brim. It seemed a bit thick, so I cut away a tiny 1/16″ strip from the edge of the thinner layer of interfacing to make a little indentation to set my wire into. It actually made the stitching a lot easier, since the wire had a place to rest. I set my sewing machine’s speed to the lowest it would go, and very slowly and carefully used a wide zig-zag stitch to attach the wire. Be really careful with this step, you don’t want your needle to break on the wire and send bits of flying metal towards your face!

Once I had my brim base, it was time to cover the underside with eggplant dupioni. I cut out a circle slightly larger than the pattern and gave it a touch of spray adhesive before sticking it to the interfacing– the side where I’d sewed the wire, because I wanted to make that the underside. Then, working from the top interfacing side (which had my pattern markings), I machine-stitched around the edge (just inside the wire) and around the head line– this not only attached the dupioni, but transferred the lines to the bottom side of the hat. I trimmed the edges of the fabric down to the wire.
I repeated the process with the black velvet and spray-adhesived it to the top side before flipping it over to the dupioni side and stitching it again around the previously-stitched edge- and head-lines. Once stitched, I trimmed the velvet down to the wire, then cut away the center hole from all layers at once and sliced the tabs open.

I tried it on at this point, and to no one’s surprise it was much, much too small– the thickness of the tabs was making a big difference in the head circumference. Being cautious, I stitched another line about 1/8″ out from the original one, and snipped the tabs out a tiny bit more. Still too small. I proceeded to stitch out more lines in 1/8″ increments, opening the tabs out with tiny snips, until the hat fit properly– even a tiny bit loosely, since I plan on adding an interior sweatband and possibly a lining, which will add more thickness. Turns out I needed a good 1/2″ extra all around my actual head circumference, so keep that in mind if you’re making your own hat!
Once the hat fit my head, I bound the outside edge of the brim. I had originally planned to bind the edge with strips of my black dupioni, but it just looked too shiny (read: cheap) compared to the velvet, so I opted for wide single-fold bias tape in black instead (the standard stuff you get at the fabric store). I machine-stitched it to the velvet side, then folded it over and hand-stitched it to the bottom, using a curved needle.
Next it was time for the crown. I realized at this point that my pattern was going to be too small– it was drafted to fit my exact head circumference, after all– but rather than re-draw the whole thing I figured I would add an extra inch or so to the bottom of the pattern, which would translate to a larger bottom circumference and an only slightly taller crown. Luckily for me I was extra-generous with this step, because I later realized that I had done my math wrong– I had calculated that an extra inch would provide plenty of extra circumference for my head, when spread out over the entire circle. However, since I was working with only about 1/3 of a circle for my pattern piece, I had only 1/3 as much extra circumference as I thought I did! I ended up with *just* enough to work with, which I only discovered after I’d done all of the sewing work below…
Anyway, I traced out my wedge of black velveteen, this time with seam allowance along all edges, and also a layer of medium-weight interfacing. The interfacing wasn’t quite wide enough to reach the top of the cone, but I figured it wouldn’t be necessary at the very tip.
I spray-adhesived the two layers together, and also ran lines of basting stitches along the marked pleating lines from my pattern. The easiest way to transfer the pattern lines to both sides of my fabric was simply to trace the pattern onto tissue paper, pin the paper to the interfacing, and run long basting stitches through the paper before ripping it away from the stitches at the end. I used red thread for the hills and blue for the valleys, so it would be easy to keep track of them.

Since the valley lines weren’t going to show, I pinched them from the interfacing side of the fabric and hand-tacked them about 1/4″ from the basting line in various spots to encourage folding in the right direction. So much easier to do while everything was still flat…

Then I machine-stitched the edges of the cone together and clipped the point. I turned it right side out and finger-pressed the seam as best I could.
Next it was time to pleat the crown. It was already starting to fold in on itself due to my hand-tacking, so it was reasonably easy to coax it into the right shape, tacking some more spots on the inner curve where they wouldn’t show. I pulled out the basting lines when I was finished.

At this point I took the finished crown and folded up the bottom curve seam allowance until it matched the brim– like I said earlier, I’d expected to have plenty of fabric to spare, but ended up with just a teeny-tiny margin. Whew! I carefully cut away the interfacing from the bottom curve of the cone so I would only be folding up the velvet layer. For additional support I inserted a ring of 19-gauge wire into the fold as I hand-stitched it down.


Finally, I settled the finished crown over the tabs on the brim and hand-stitched them together. I will note that I ended up doing this step no fewer than three separate times– the second time was because I’d made the mistake of stitching the tabs too high up, which made the crown collapse in a bit as the tabs tried to fold inward; the third was because despite my careful fitting, the hat was still a bit too tight once I added the crown (not sure why exactly– maybe the wire?) so I had to go through and cut out one of the layers of interfacing from the tabs to give my head a bit more room before re-stitching. I’m glad I used relatively large stitches when I attached things– easy to pull out, and they won’t show once I add the decorative hatband!

Anyway, the hat is complete! Now to decorate!
