

Taking a break from construction, it was time to get started on the most distinctive feature of the costume– the beetlewings! (a.k.a. elytra)
Most sources online agreed that beetlewings are too brittle to trim without steaming them first to soften them, so I was all set to start the steaming process… But I decided on a whim to skip the steaming and see if a pair of regular nail clippers would do the trick. And hey, they worked!
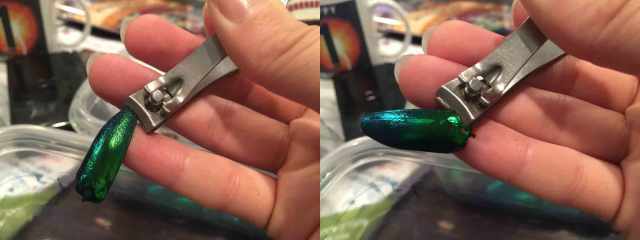
I found that as long as I didn’t try to clip across the entire curve of the wing at once– instead putting the clipper only halfway across the curve at a time– the wings would clip cleanly the same way fingernails do. Since I was going for a really basic trim, just to remove the pointy end and the gnarly stuff at the wide end of the wing, this process worked perfectly. I think if I’d wanted to shape the wings more I might have needed steaming so I could use scissors, but as it was, I was just happy to avoid one more step.
Then came the laborious process of clipping all 1,000 wings (I stopped at 1,000 because I wasn’t sure how many I’d actually need to do), so I put on Netflix and started clipping. Once I got into a routine each wing took about 10-15 seconds to clip, which doesn’t seem like much– but it definitely added up, and somehow managed to take a lot longer than you’d expect given the math. All in all, it took me two extremely long evenings to finish the 1,000 wings.
Anyway, once the wings were clipped it was time to punch holes in them. I started off trying to just use an awl to punch through, but while it technically worked it was still somewhat difficult because I had to manually twist the awl back and forth to get it to widen the hole sufficiently (which hurt my wrist over time), and the twisting process occasionally resulted in cracking. Steaming the wings helped with the cracking issue, but not the twisting, which was literally a pain.
I decided to try something with a little more power, and purchased an electric micro-engraving pen on Amazon.

It’s like a tiny rotary tool with several tips to choose from– I think it was originally intended for acrylic nail manicures, but these wings are so much like fake nails anyway that it worked out perfectly. Seriously, this is the best tool EVER for drilling holes in beetlewings– it fits comfortably in the hand and is relatively easy to control, and since I had to deliberately press it down to drill the hole I didn’t worry about nicking myself accidentally if it slipped. I would recommend this tool to anyone looking to drill holes quickly and easily without fear of cracking the wings– it just buzzes right through.

I did the drilling over a piece of scrap wood to avoid ruining my coffee table.
After spreading out my basted-together pieces of crochet lace and tulle, I safety-pinned them at intervals to keep things flat, then spread them out over a towel, which I laid over my lap to start sewing. The towel kept me from inadvertently stitching through the lace to my clothes, and made it easier to transport the fabric without disturbing anything.
I used dark green thread to stitch the wings through the crochet lace and tulle layers– only one stitch per hole, since these aren’t really going to have any tension on them. I did each wing individually rather than trying to zig-zag my thread between wings.

I started off trying to keep them mostly parallel and pointing downwards, but realized after I’d done part of one sleeve that it looked weird– too uniform. Closer inspection of some of the photographs convinced me that I needed to offset the wings so they were more haphazardly oriented, so I had to take off some of the wings and re-stitch them at an angle so they were no longer parallel to the others. While I was at it I added some more wings to make them less spread out, which also helped with the overall look.

I’ve been stitching the wings on the sleeves and skirt pieces before doing any more construction on the gown, because it’s a lot easier to spread things out flat on my lap and sew than to crouch next to a dress form and stitch things on while the dress is hanging. So far I’ve finished the center portions of the sleeves and most of the front skirt panel, staying away from hems and edges so it’ll be easier to stitch pieces together later. It’s really the back skirt panel that’s going to take forever, since it’s so huge, but I’ll just keep plugging away at it!

Pingback: Lady Macbeth Beetlewing Gown, Part XV: Final Thoughts | It's All Frosting...