
The main accessory for the outfit is a fabulous rhinestone choker– it’s huge, it’s gorgeous, and it probably inspired my long-standing partiality for festoon-style necklaces. I’ve been drooling at the thought of getting to wear something similar, but it’s been quite a process getting to the finish line on this one…

I had a difficult time finding anything that was as elaborate as the choker in the movie– sadly, modern tastes don’t seem to trend towards festoon necklaces. Then I came across a gigantic necklace (billed as a shoulder chain) that had surprisingly familiar-looking elements…
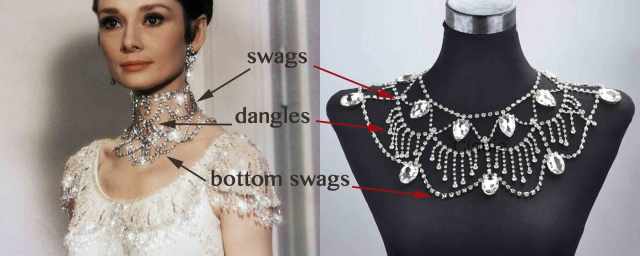
When fastened higher on the neck like a choker, it looked a whole lot like the original!

I did some tinkering with my trusty pliers to rearrange some bits of the necklace to be more symmetrical and to hang better on the neck, and everything was going fine…
…until I actually tried the necklace on. You see, until then I’d had it pinned to the neck of my dress form so I could adjust the shape more easily, but I hadn’t accounted for the lack of pins (ouch!) for the actual occasion. Without them, the weight of the necklace meant that it refused to stay high up on my neck– instead, it kept slipping down and looked more like a regular necklace than a choker. I couldn’t just make it tighter– I’d choke, or at the very least end up with red marks on my skin– and it didn’t have enough structure on its own to stay upright.
Looking more closely at the movie and pausing it at appropriate spots (sorry, can’t find any photos that show what I’m talking about), I realized that the choker Audrey Hepburn wears is actually two necklaces– one choker and one regular necklace; that way the weight of the bottom necklace doesn’t drag the choker part down. I went back to eBay to try to find separate necklaces I could combine for the right effect, and actually found these two from the same seller:
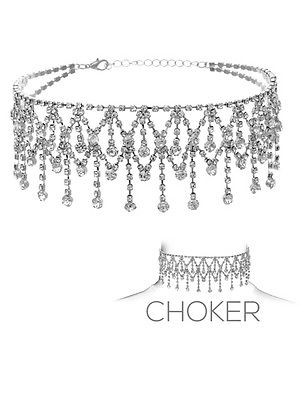

The first necklace appeared to have the vertical support it would need to sit upright on my neck, and the second one could easily be moved downward to form the drapes along the collarbones– while you can see that there’s a series of connectors just above where the draped sections start, those are easy to snip through to allow the whole necklace to sit lower. Plus, the second necklace came with earrings that looked pretty similar to the ones in the movie, so I wouldn’t have to buy them separately. I cringed a little at the added cost (and the waste of my time and money on the first necklace attempt), but in the end I bit the bullet and purchased both.
Once the necklaces arrived, I set them up on my dress form (sans pins this time), snipped through the necessary connectors, and then tried them both on. Success!

The upper necklace is light enough and structured enough that it stays up high on my neck, and the lower necklace drapes nicely over the collarbones. Happily, the rhinestone size on the two necklaces is close enough that they look like they were intended to go together, rather than being two separate pieces.
So the only question remaining is, what do I do with my first necklace attempt? Does anyone really need a gigantic rhinestone collar that doesn’t quite stay up around the neck? Perhaps I’ll disassemble it for parts…

These step-by-step costume construction posts are FASCINATING.
LikeLiked by 1 person
Pingback: My Fair Lady Ballgown, Part X: Final Photos! | It's All Frosting...
I would love to “rent” the necklace 😉
LikeLike
LOVE this construction series! Mind if I ask what Etsy seller you found these at?
LikeLike
I got them both from this eBay seller: http://www.ebay.com/usr/wegotstuff1?_trksid=p2057872.m2749.l2754
LikeLike
Hi I’m trying to create this look, I have the two peices but I’m unsure where exactly to cut on the lower necklace. Which connectors did you cut? Thanks!
LikeLike
So do you see how the top part of the choker is kind of made up of X’s of small rhinestones with big rhinestones above and below? You will cut the connectors between the X’s. Only cut between lines of small rhinestones– you will never cut anything next to any of the large rhinestones. There will always be a full line of small rhinestones on each side of a cut connection. Does that make sense?
LikeLike
Hi, thank you for your speedy response! I believe I understand what you mean but just so I’m certain there’s 19 little “x’s” on the top line of the choker did u cut all of them in half? And you never cut anything below the second structural horizontal bar running just below the x’s, where it starts drooping?
LikeLiked by 1 person
You do not cut the X’s in half, you cut between the X’s. They will still be intact and hold their X shapes (except for two out near the ends– they have . And yes, you cut between every single one. I have a photo showing this but can’t post it in a comment for some reason… I also ended up cutting through two more connectors once the necklace was on– it helped it hang better on me, but I would hold off on cutting anything else until you’ve tried it on a person.
LikeLike
Sorry, messed up editing there. I was going to say that the two extra connectors I cut were near the ends, but you should ignore that for now as it complicates the issue. Just cut between the X’s for now and then see how it looks.
LikeLike
And to further clarify (sorry, I just don’t want you to ruin your necklace) the connectors you are cutting *are* the silver structural horizontal bar. You won’t be cutting anything else, just those pieces between the X’s.
LikeLike
Thank you for your instruction! I wore the two pieces to my prom a few weeks back and it’s was stunning, I got many compliments! Thank you so much.
LikeLiked by 1 person
Pingback: 1898 Black Moiré Convertible Gown, Part I: Evening Gown Sketch | It's All Frosting...
Where did you purchase the two rhinestone necklaces?
LikeLike
I bought them on eBay, but it appears that the seller is no longer active. Sorry!
LikeLike