Strawberry Yogurt Popsicles

It’s strawberry season! And you know what that means! Yes, it means delectably juicy and flavorful strawberries… but it also inevitably means slightly-past-their prime berries that are going mushy, or never-quite-ripened berries that sneaked their way into your box. This recipe turns those berries into pure summer perfection. Plus, it has yogurt in it, so you can claim that it’s healthy…

I based these strawberry yogurt popsicles on a strawberry frozen yogurt recipe I fell in love with from David Lebovitz’s The Perfect Scoop, which is full of fabulous recipes. It’s a fantastic fruity frozen yogurt– full of bright strawberry flavor with none of the heaviness of regular ice cream. There’s so much fruit in it, it’s practically a sorbet. But I really didn’t feel like waiting to freeze my ice cream maker insert for 24 hours before I could use my fast-ripening berries, so I decided to just make the mix and freeze it in popsicle molds instead.

It was perfect. Ordinarily the churning action lightens the yogurt and makes it soft and scoopable, but frozen in molds it turned out to make the perfect popsicle texture– icy and firm, but still bite-able. And of course, that summery strawberry flavor still comes through perfectly. I’m betting you could make these with frozen strawberries just as well, if you’re looking for a taste of summer when it’s not the height of strawberry season. Enjoy!

Continue reading

Mini Carrot Cake Cheesecakes

“More carrot cake jam?”– you may ask, wondering just how many more recipes for this delectable condiment I have planned. Well, this is my last variation, and it’s just as delicious as the previous ones. It’s simple, really– standard bite-sized cheesecakes with a swirl of jam baked into them– but irresistible once you’ve tried one. I like them best frozen, and really can’t decide whether I like these or the Carrot Cake Ice Cream better. Obviously, the recipe would work equally well with a jam or preserve of your choice– I’m thinking sour cherry next time?

I will note that this recipe makes 40 bite-sized cheesecakes in a mini muffin pan. I used a silicone pan, which made it a snap to remove the chilled cheesecakes– if you’re using metal, I recommend using paper liners. If you don’t have two mini muffin pans, the unbaked crumbs and filling will keep at room temperature while you bake and freeze your first batch– just don’t let it sit overnight or anything.

Continue reading

DIY Pleater Board

In the course of my reading about constructing Victorian ensembles, I’d come across various methods for making lengths of pleated trim– using a ruffler foot, fork-pleating, eyeballing it, and the “Perfect Pleater.” That last is basically a length of pleated cardboard that you tuck your fabric into and iron to form uniform pleats. Unfortunately name-brand Perfect Pleaters can cost upwards of $150.00, which is kind of insane for something that simple. I knew I’d be making my own at some point, so when I started on my 1880s Squirrel Bustle Dress I figured it was time.

After viewing a couple of online tutorials I decided to follow this one, which seemed the most straightforward and efficient. Instead of posterboard it uses unpasted wallpaper lining paper, which is a nice, heavy paper that comes in rolls so you can make a long pleated section without having to join up separate sheets. Once you’ve marked off your pleating lines and folded them together, you use spray adhesive to glue the whole thing to a fabric backing so it stays together.

I decided to make my pleater board 12×24″ to fit onto my fold-down ironing board– that meant the total length of paper pre-pleating would be three times that long (plus an inch on either end). Since my wallpaper lining was something like 27″ wide, I figured I’d just cut it in half, lengthwise, to make two identical pleater boards– obviously, I did this *after* measuring, marking, and forming my pleats, to avoid having to do twice as much work.

For 1″ pleats with a 1″ return, I marked off alternate lengths of 2″ and 1″ on each side of the paper, then drew in the fold lines with a pencil. Using the tip of a butter knife, I scored the lines to make it easier to fold them later.

I used my metal yardstick to help fold the paper along the scored lines, then ironed the paper flat– or at least, as flat as I could. The large sheet of paper was a little unwieldy to work with at first, but I managed to wrangle it into pleats. Since the iron didn’t do the best job and making those pleats stay flat for long, afterwards I weighed down the whole thing under a flat surface to encourage it to stay flat in preparation for my next step.

Continue reading

1880s Hat Conversion

Once I’d finished my 1880s Squirrel Dress, I had to have a hat to go with it. I have yet to venture into completely handmade millinery, so I’m always eager to find existing hats that can be adapted to more historical uses. My favorite may always be the Regency Cowboy Hat bonnet, but this one is a close second– I made it from a children’s trilby hat in bright pink.

I was going for something along the lines of the hat in the center here:

Or this one, from the Met Museum.

Both are probably slightly too early in the period to match my dress, but they’re just so pretty that I decided to go for it anyway.

Continue reading

1880s Squirrel Dress, Part VI: Trimming

Once I’d finished the basic dress, it was time to trim the skirt. Originally I’d planned a double row of wide pleats on the underskirt, with another row of pleats along the bottom edge of the apron overskirt. However, the more I looked at the ensemble the less I liked the idea of all those pleats– they seemed fussy, somehow, and not as tailored and simple as the bodice. It was time to rethink.

I decided to make one wide row of pleats to put along the hem, and to put off further decisions until that was attached. Accordingly, I pieced together a 300″ strip of my fabric (with the stripes oriented horizontally for a fun variation), did a narrow hem on both long edges, got out my homemade pleater board (more on that later), and started pleating. It was really annoying. It took forever. My pleats kept pulling out of the board as I worked, and waiting for the pleats to cool completely before moving on to the next section was extremely tedious. But I suppose it could’ve been a lot worse– I could’ve had to pin them individually before pressing them, right?

Continue reading

1880s Squirrel Dress, Part V: Bodice

So… you know how I said that I’d sourced all of my fabrics, and had picked out a dusty pink cotton I already had in my stash to use for part of the bodice of this dress? Well, I lied. Not so much lied as had second thoughts. And third thoughts. The pink was fine next to the striped fabric, but the velvet I wanted to use for the lapels was so deep and saturated that it just made the pink fabric look washed out and plain. The tough part was that I didn’t know what else to use– I didn’t want another patterned fabric that might clash with the stripes, but I hadn’t been able to find any other solid cottons that matched well. I couldn’t use taffeta or jacquard, because that wouldn’t work with the cotton main fabric– too fancy. I could always choose white, but that seemed like giving up.

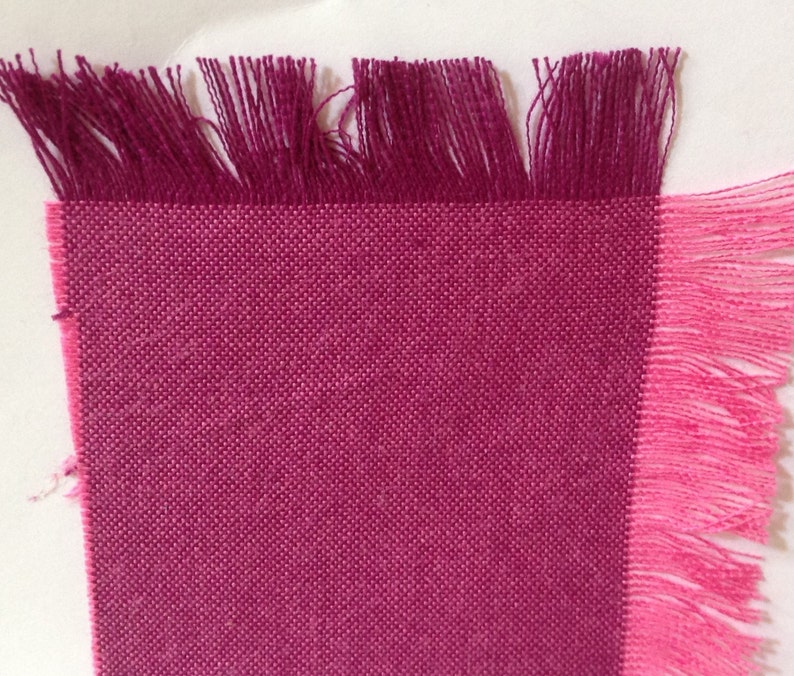
Finally, I came across a line of fabrics called “peppered cottons” by Studio E Fabrics. They’re shot cottons– fabrics with the warp and weft threads in different colors so they change color at different angles– and they came in some lovely shades. I ended up picking “Fuchsia,” which has plum-colored threads in one direction and hot pink in the other.

Peppered Cotton FUCHSIA 40 by Pepper Cory for Studio E image 2

It works as a nice “bridge” between the cooler-toned squirrel stripe and the warmer-toned velvet. I also used it as the reverse side of the velvet collar and cuffs.

Anyway, once I had the fabric issue resolved, I was able to use my revised pattern to cut out the real bodice– I was able to use my new rotary cutter and cutting mat, which made the process so much faster! In order to get the stripes to be symmetrical I cut out my striped fabric one piece at a time, mirroring the somewhat see-through lining fabric to get the placement just right.

I will note that I made a tactical error in laying out my front bodice pieces– I should’ve taken note of the dart placement to ensure that the darker narrow stripes weren’t going to get swallowed up by the darts. If I’d had the darts take up the wider, lighter areas between the stripes, the design would’ve had a flattering taper at the waist– as it is, the stripes disappear into both darts, leaving a large stripeless area that doesn’t look quite as nice. Sadly, I didn’t realize this until I’d actually assembled the bodice, which made it far too late to fix.

Continue reading

Carrot Cake Ice Cream

Oooh, this is good, you guys. Really good. I swear, I’ve been looking for a good carrot cake ice cream for ages, and I’ve tried it at a bunch of excellent ice cream parlors, but this is definitely the best one I have EVER had. It starts with my carrot cake jam (which I really can’t get enough of, in case you couldn’t tell), which gets swirled generously into a no-churn ice cream that tastes like frozen cream cheese frosting. Add in a generous handful of graham cracker crumbs (you could add nuts as well), and you have a sinfully delicious scoop of creamy, gooey-chewy (that’s a word, right?), carrot cake-y goodness.

Once you’ve made the jam, this recipe takes almost no time at all to come together, and I guarantee it’s worth the effort. I’m already plotting when I can make my next batch, because I’m already reaching the bottom of the container on this one and can’t stand the thought of running out!

Continue reading

Carrot Cake Macarons

So, having made (and loved) my carrot cake jam, it was time to make macarons! They turned out absolutely delicious– the macaron shell was just “cakey” enough to really evoke carrot cake, with the almonds lending a nutty background. The filling combination– carrot jam and cream cheese frosting– was perfectly sweet and tangy at the same time. I know I say this a lot, but these may be a new favorite macaron recipe!

Continue reading

Carrot Cake Jam

I’ll start by noting that my decision to make this jam was mostly a happy accident– that being said, I’m so glad I did, because the results were *amazing*.

Anyway, I had some egg whites left over from my Dulce de Leche Flan, which made me start thinking about baking macarons to use them up (because why waste them on something easy?). And then I wondered what flavor of macaron I might want to make, and since Easter is coming up I thought about carrots, and carrot cake. But how to infuse carrot cake flavor into a macaron? Well, that’s where the carrot cake jam came in.

You’ll see the finished macarons later, but this jam is good for so many other things– it’s great with cream cheese on toast, delicious as a filling for cookies or tartlets, but my favorite use has to be for making the very best carrot cake ice cream *ever* (don’t worry, recipe to come).

The jam itself is sweet, spicy, and has a nice array of textures due to the variety of ingredients. I particularly like the pecans– without them the jam is awfully sweet, and they add a background savoriness that evokes the “cake” feeling of the original inspiration. You might also consider adding some shredded coconut, if you like it in your carrot cake generally. Either way, it’s sure to be sticky, gooey, and delicious!

Continue reading

Dulce de Leche Flan

The other day I was at the grocery store, minding my own business in the Latin-American food aisle, when I spied a can of pre-made dulce de leche! I was unreasonably excited about this, but you’ve got to understand that it was the first time I’d ever actually seen it in real life– I’d always been told it was available, but I’d never seen it for myself.

Rather, I’d been reduced to making it from sweetened condensed milk, either using the highly dangerous boiling-the-can method, or the slow oven method. In any event, I was thrilled to find it ready-made, and even more thrilled that I’d finally be able to make my very favorite dulce de leche flan, which I first made about fifteen years ago and have pined after ever since.

This flan is amazingly creamy and smooth, with a nice caramelly flavor from the dulce de leche. Don’t overcook or you’ll lose the texture– the center should be jiggly when you shake the pan in the oven, and it’ll cook the rest of the way after you take it out.

Continue reading