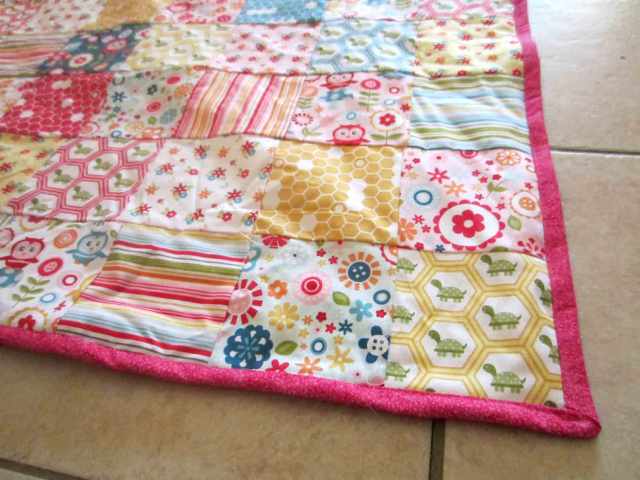
One of the traditions I’ve tried to keep up is that friends or family members who have babies get a handmade blanket from me. There are so many adorable quilting fabrics out there that it’s fun just picking out what I’m going to use! And every now and then I come across a line of fabrics that has so many cute options I can’t pick just one– so I pick all of them.
This quilt was made from the fabric line “Fine n’ Dandy” by Riley Blake, and I bought a coordinating set of all the fabric designs to use in my blanket. The set I purchased was a 10″ layer cake, which means that it’s 18 squares of fabric, one of each design. They also sell “charm packs,” which are sets of 5″ squares, but the pricing is such that it’s cheaper to buy a set of the 10″ squares and cut them in quarters with a rotary cutter. So that’s what I did. (and when I say “I,” I mean “I and my two friends, who I recruited to assist in my crafting efforts for our mutual friend, the mother-to-be”)
With all the different colors and designs we basically just did a random-ish placement of the squares, then took a photo of the design so we wouldn’t mess it up in the patchworking process (only partly successful, as you can see there are two identical blue-patterned squares in the third column from the left). We chain-stitched pairs of squares together, then stitched the pairs into rows, which were eventually sewn into an 8×9 array of squares, which with the 1/4″ seam allowances ended up being just about 36 x 40″.
I decided to back the quilt in a lovely aqua-colored minky, embossed with tiny stars, and since it’s such a small quilt it really doesn’t need any actual quilting, so I left that out– though I did put in a layer of batting to give the blanket some thickness. For binding, I bought half a yard of a magenta calico and made my own– much cheaper than purchasing blanket binding, and I had more colors to choose from.
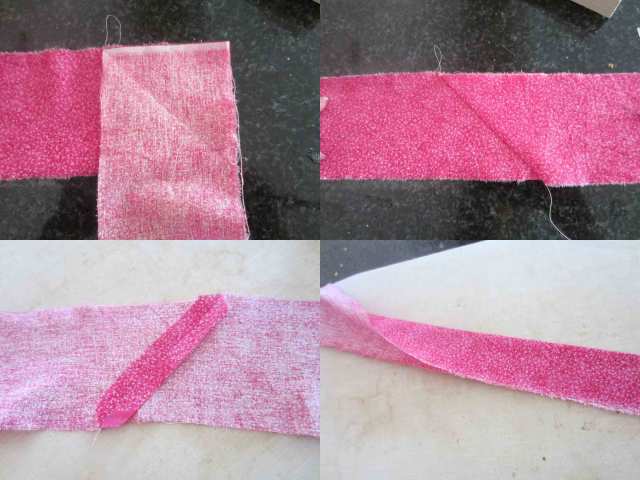
To make binding, simply cut or rip your fabric into 3″ wide strips along the grain. Sew the strips together using a bias seam to make one long strip. Then iron it in half along its length. Presto, binding!
For a video on how to bind the edges, click here.
Notes:
- Chain stitching is totally the way to go for stuff like this. In case you don’t know what it is, it’s where you line up your pairs of squares so that when you come to the end of your fabric seam, you do a few stitches on nothing at all (creating a chain of thread) and then push your next pair of squares under the presser foot. Then you keep sewing. It makes a chain of sewn pieces that you can then snip the threads on. Not only does it save time and thread, but it helps keep your patchwork squares in order so you don’t lose track of your design.
- You can buy blanket binding that works fine for the edges of your blanket, but it gets pretty expensive since it comes in packages of 4 yards and you’ll need two of them. Much cheaper to make it yourself. Keep in mind that this binding isn’t bias binding– it’s cut on the grain– because it doesn’t need to go around curves (unless you decide to do rounded corners).
- Using a bias seam to connect your binding strips to each other is important for more than just aesthetics– it reduces the number of layers of fabric to sew through when you bind the edge. Just think, if you’d used a straight seam you’d be sewing through four layers of fabric (outside, seam allowance, seam allowance, outside) at that point once you folded the binding in half. Eight layers of fabric once you’d bound it over the edge of the blanket. And that’s not even counting the blanket itself! With the bias seam the seam allowances never overlap once you’ve folded the binding in half, so you reduce the layers by one.


Hi Tanya– I’m a baby quilt maker too! I’ve loved making wedding quilts and grand-baby quilts for my kids. Fun to see yours!!
LikeLike
Pingback: Cut Chenille Baby Blanket | It's All Frosting...